Posting Pullup - 2013
December 7, 2013
Not much accomplished today. Lower temperature and moderate wind kept all hands close to heaters.
Some time was spent examining the second of three air tanks. Again news is not good. A waste area of substantial depth about size of a dime was located on the largest tank, 90" length. Two tanks now not serviceable.
Drawings will be constructed. Once reviewed, drawings will be sent off to ASME shops to obtain quotes.
December 15, 2013
A bit of progress yesterday.
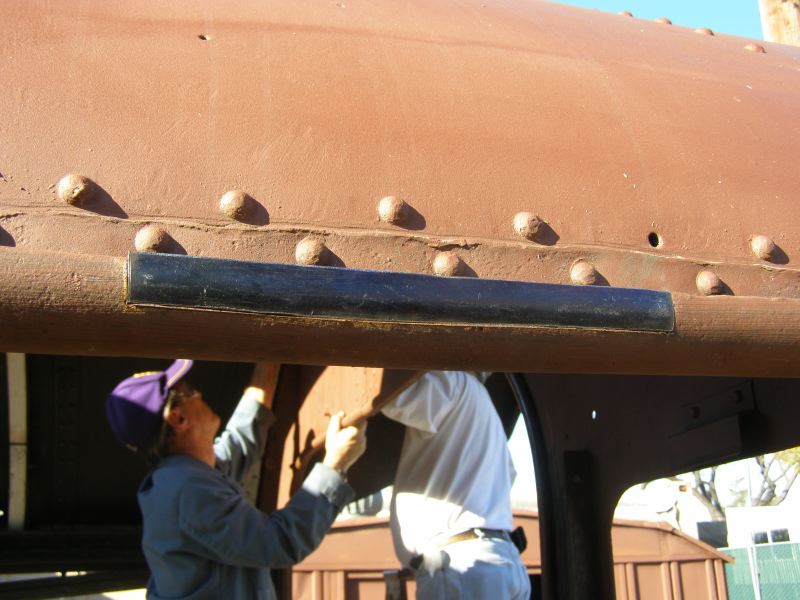
Cab - Furring strips along the front and rear of the cab roof that were cut out and installed years ago by the trolley group were installed with more appropriate hardware. Repairs to the last segment of damaged fireman's rain gutter was started.
Cab will soon be ready for wood liner.
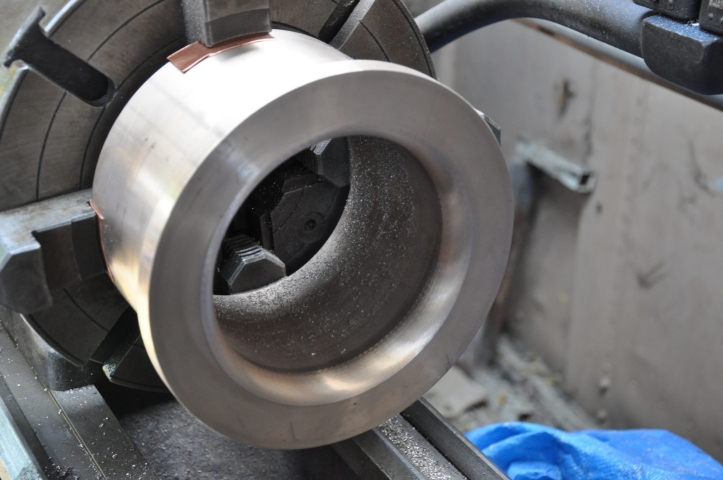
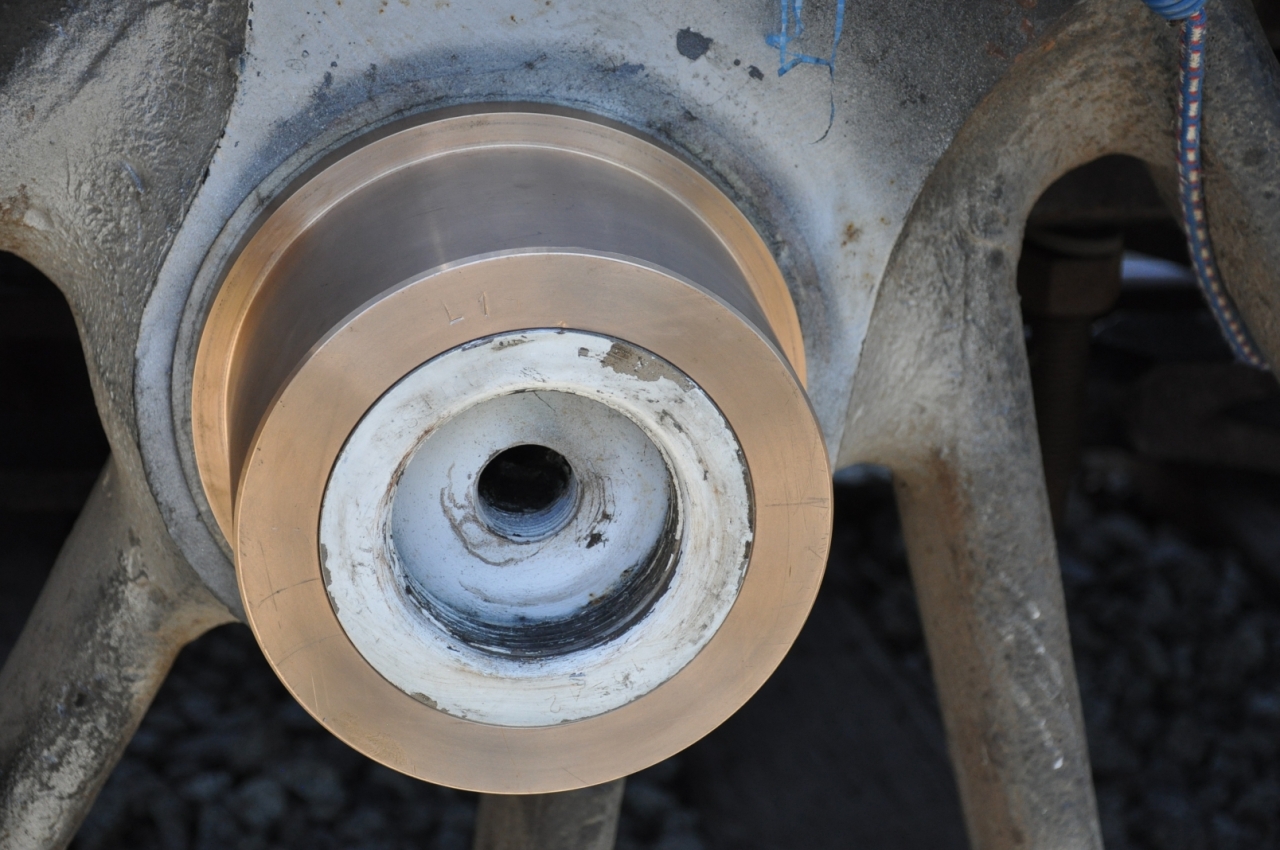
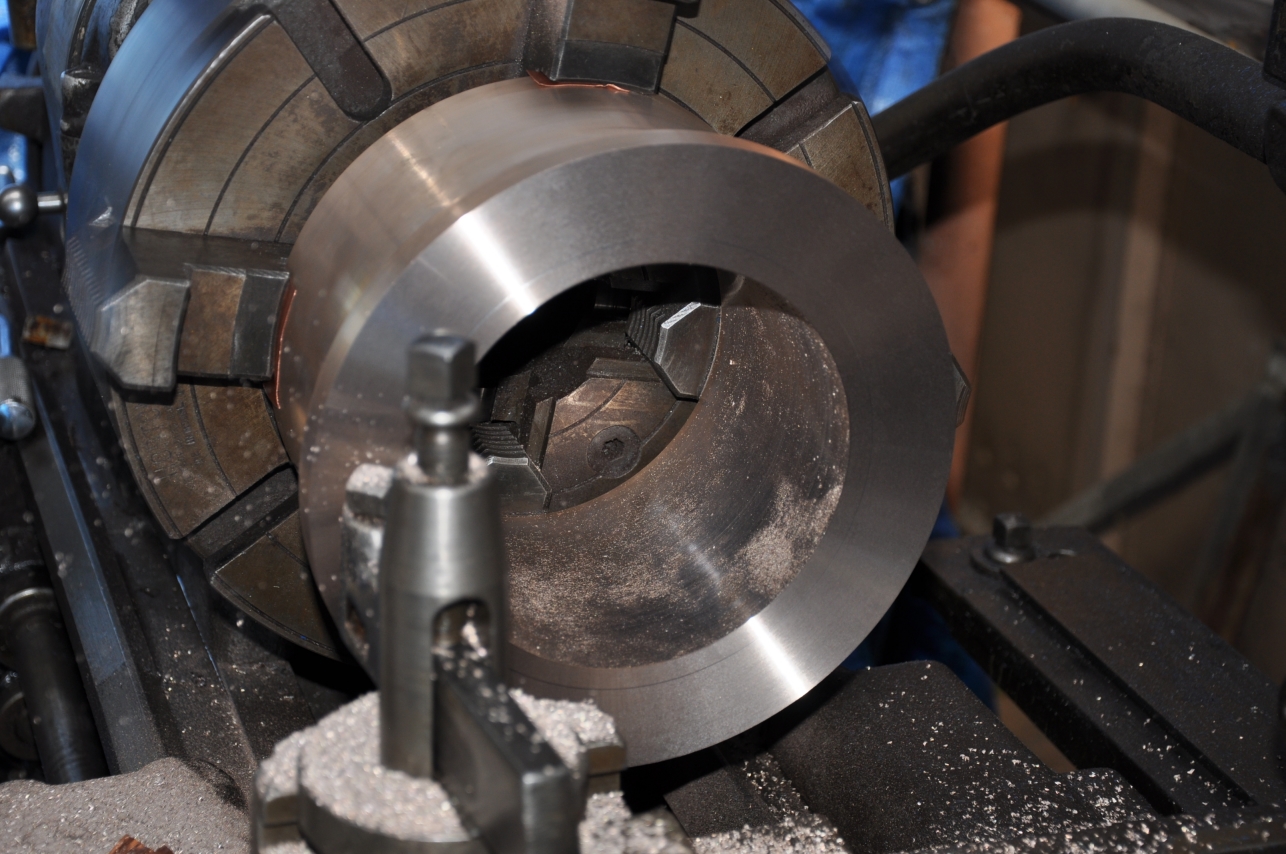
Left Front Valve Cage - Very accurate measurements were taken of the inside surface in the left front valve's cylinder. These numbers are needed to complete a drawing for the new valve cage. Several other small issues remain with this drawing. Drawing should be ready for quotes in early January.
Air Reservoirs - Third air tank was removed from the locomotive to enable inspection. A generic drawing has been started to be used to obtain quotes. Hopefully all work will be complete and ready for quotes by the end of January.
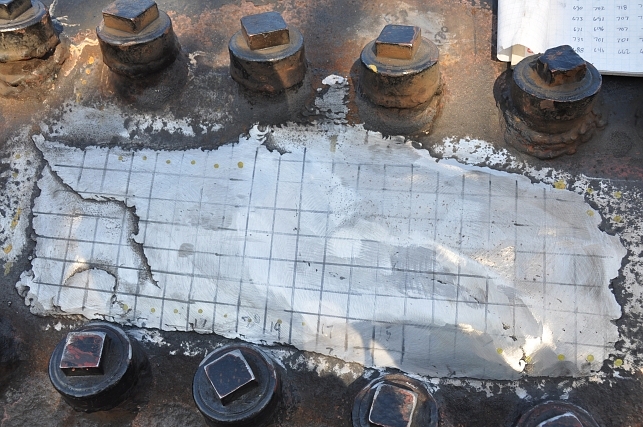
Boiler - Grinding and polishing of an area on the fireman's side of the fire box that has seen several layers of pad welding applied. This area is about 5 inches by 24 inches. Ultra sonic (UT) measurements were taken. Welded area now meets required minimum thickness. There is still a significant area to be welded along top and one side. Fortunately there are no restrictions on the size of an area that can be pad welded in a stayed area, otherwise this would have been a very expensive repair. There are several other areas requiring pad welding. These areas are smaller then the section presently under repair.
A UT measurement was taken in each square in the above image and is recorded. A bit more grinding and polishing is needed to complete the work.
November 30, 2013
Measurements were taken of the inside diameter of the cylinder that holds the left front valve cage. This was needed to update the valve cage drawing. Once an accurate drawing has been created, the drawing can be submitted to vendors for machining of a new cage.
Performed NDT on one of three of the locomotive's air reservoirs. News is not good. A deep gouge and waste area was found on visual inspection. The area was polished to form a flat spot for the transceiver of the Ultra Sonic Thickness gauge. Measured thickness was .177. Calculations call out a minimum thickness of .223 for a 110 PSI air system. By Part 230 rule, air reservoirs can not be repaired. This tank is not fit for service.
Over the coming weeks the remaining tanks will be inspected.
November 26, 2013
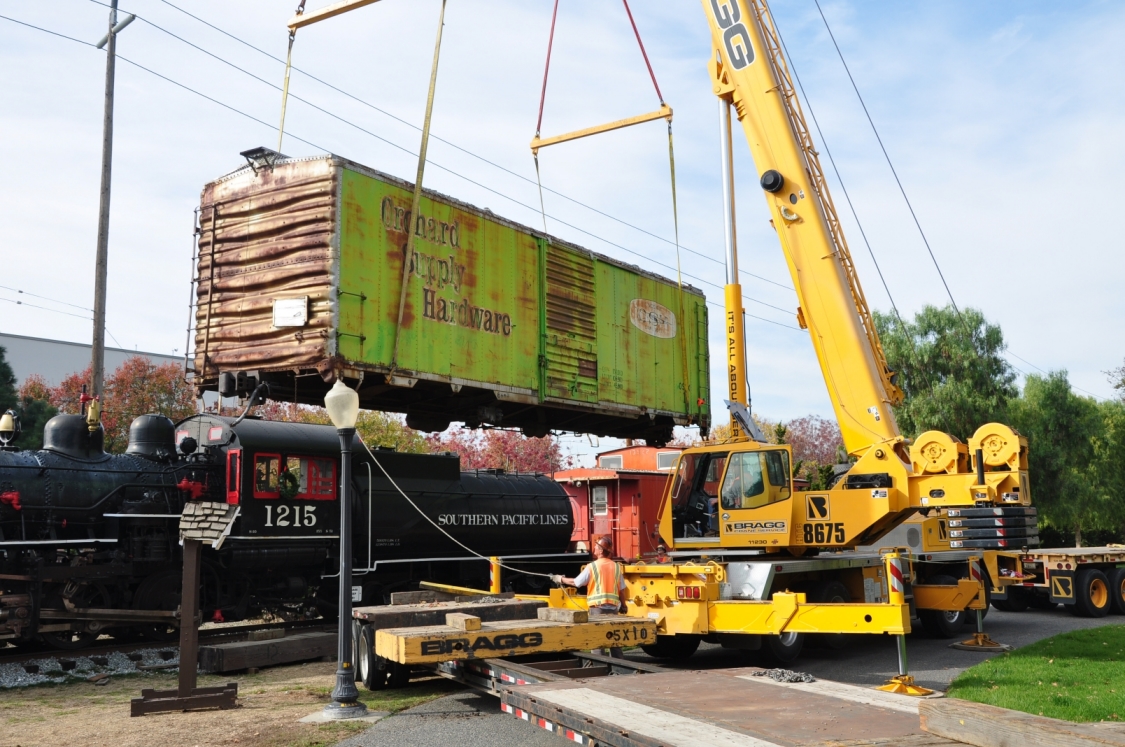
The OSH Box car that sat along Azuerais Ave. for 50 plus years was moved today to San Jose's History Park.
In the coming weeks the display track that SP1215 and MoPac caboose sit upon will be lengthened and the boxcar set between the locomotive and caboose.
The move would not have gone as nice as it did without the help of Tom Anderson and Larry Murchison. On Saturday, Tom helped preparing the car and getting cribbing materials pre-positioned. Today, Larry helped positioning crib material to set the car body upon.
November 9, 2013
Several members that have not been available fir some time joined today's work crew and helped make this a extremely productive session.
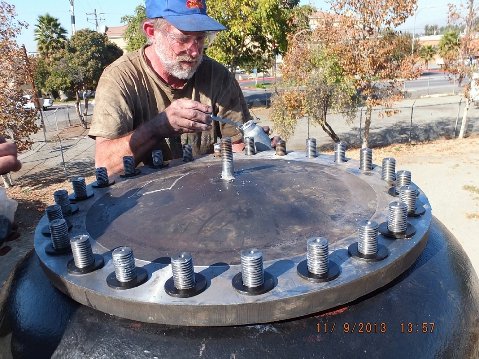
Today the new steam dome cover was set into place. This is a significant mile stone. In September of 2005 (yes, eight years one month past) calculations based upon ultra sonic measurements revealed the old cover to thin. Regardless of how the calculations were manipulated, the results were always the same, cover not serviceable at 210 PSI.
Machining on cover was completed several weeks ago, but the thicker cover required replacement of 22 of 24 dome studs. Material for new studs was on hand. Longer studs were machined. Today those studs were set tight. The new cover slipped into place after a couple of small "adjustments" were performed.
Every 3 or 4 months the locomotive and tender are rolled to keep journals lubricated. In the past, two forklifts were employed. The Clark forklift although large is not suitable for this task. Its not geared low enough. Over the years of CTRC service, several components in the drive line have failed. Continued use this machine in this manner eventually lead to another costly if not catastrophic failure.
Today we experimented using a jeep winch and pulleys to pull the locomotive. The Wiggins lift was required to assist climbing a rail joint other wise the move went well. There are a couple of issues to resolve. It now appears that the only use of the Clark during future moves of the locomotive is as an anchor for the jeep.
The stairs that are used to access the locomotives cab area received some much needed help. A new brace was added and preparations were made to apply a new coat of paint.
The surfaces of the turntable and stand for the water tank were cleared of leaves from the pepper tree. Request has been made to fairgrounds staff to have the tree pruned which may happen in the next week or two.
November 2, 2013
As in the past, there is progress. Over the past two weeks, 22 of the 24 steam dome studs were extracted from the dome. This was necessitated due to the thickness of the new cover. Studs were removed by welding a nut on to the stud. An large air impact wrench was then used to unscrew the stud.
Machining of new studs is well underway. Three of the new studs are already in the dome. If all goes well, all studs should be back in the dome by close of business next Saturday.
Pad welding on a large area of the firebox continues. The area that is being built up is about 12 inches by 5 inches. Two passes have been completed. The area requires grinding and ultra sonic after which ultra sonic measurements can be taken. A third weld pass my be required in a smaller area.
Cleanup upon the exterior of the cab continues. If weather holds, a primer coat will be applied to the exterior next Saturday.
October 19, 2013
Small but productive crew.
Firebox wrapper sheet pad welding - Light grinding and sanding was performed on the welded area on the fireman's side of the firebox wrapper sheet. Ultra sonic measurements are much improved but a second pass is going to be required. That process started today. Unfortunately the welder ran out of the needed rod with about 1/3 of the work complete.
Steam dome cover - After 8 attempts and adjustment in hole location, the new steam dome cover finally accept the dome's studs. It appears that at least 12 studs will have to be replaced to provide proper length.
Cab - The cab's side vents were removed and hinges cleaned. Vents now move with ease.
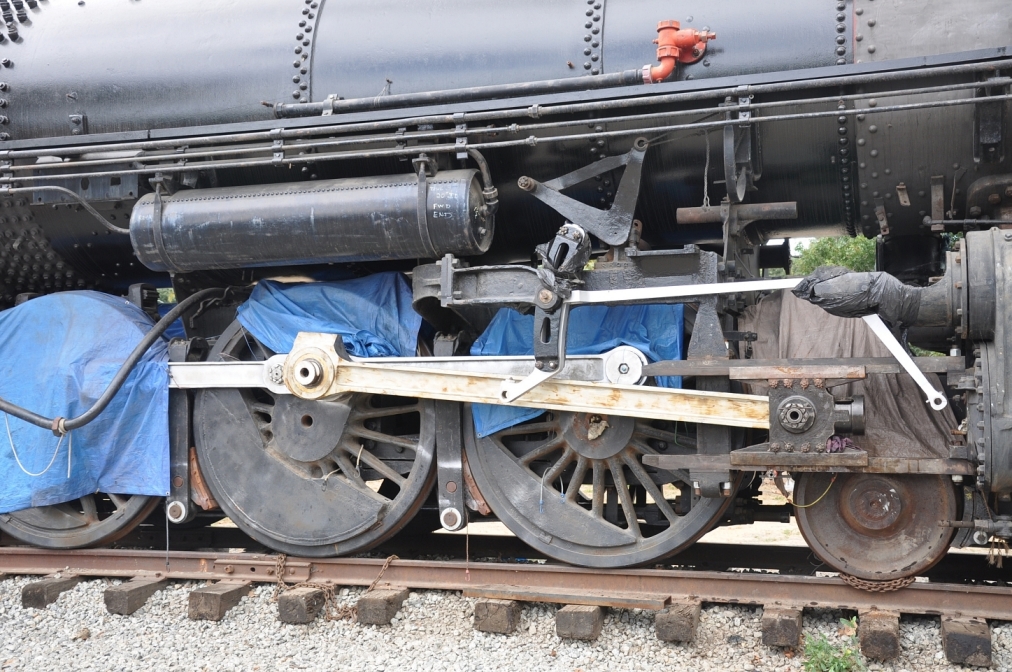
Winterizing locomotive - Now that rod bushings are in place, new plastic tarps were acquired and set in place to provide protection from up coming seasonal rains.
Thanks to all that participated.
October 5, 2013
Several significant tasks under way.
Several of the machining steps on the new steam dome cover have been completed. The gasket side of the cover was machined flat earlier in the week. Today the top side of the flange was machined flat and a center hole was drilled and tapped. The preceding steps were completed on the barn's Leblond lathe. (We could not have completed a good number of tasks without that machine!) The cover will now be moved to the restoration site, where 24 one inch holes will be drilled.
Our welder has returned from an extended "vacation" in Pennsylvania. Welding upon the firebox wrapper sheet on the fireman's side has again begun. A good number of pounds of welding rod is going to be required in building up thin areas.
More of the cab sides have been wire brushed and primer applied.
October 1, 2013
New cover arrived this morning. Initial measurements are excellent.
September 28, 2013
Small crew today.
We were unable to verify that grease was flowing threw the number 2 left driver pin to the bushing for the front rod. It was deemed necessary to pull the left main and front side rod. The grease passages in the left main pin were cleaned and grease flow was verified. The rods were then installed. Process only required 3.5 hours.
The new steam dome cover is suppose to ship Monday from Fort Worth, TX. I would expect it to arrive late in the week.
September 7, 2013
Day was spent forcing grease into a couple of rod pins. Finally were successful getting grease into both cross head/main rods and the main rod bushing on left side. I'm not sure about grease making its way back to the main pin's side rod bushing on the left side.
Believe most of the work on the engineer's side rain gutter is complete.
August 31, 2013
Today the left main rod was returned to the locomotive. Installation of the rod and main pin bushing went rather well. Several hours were spent cleaning and repairing the threads in the crosshead pin for the grease adapter.
In the above image the cross head pin is sitting on a tie adjacent to the rear wheel of the engine truck.
Repairs to the rain gutter on the engineer's side of the cab are complete. A section of the gutter was cutter away and a new section welded into place.
August 24, 2013
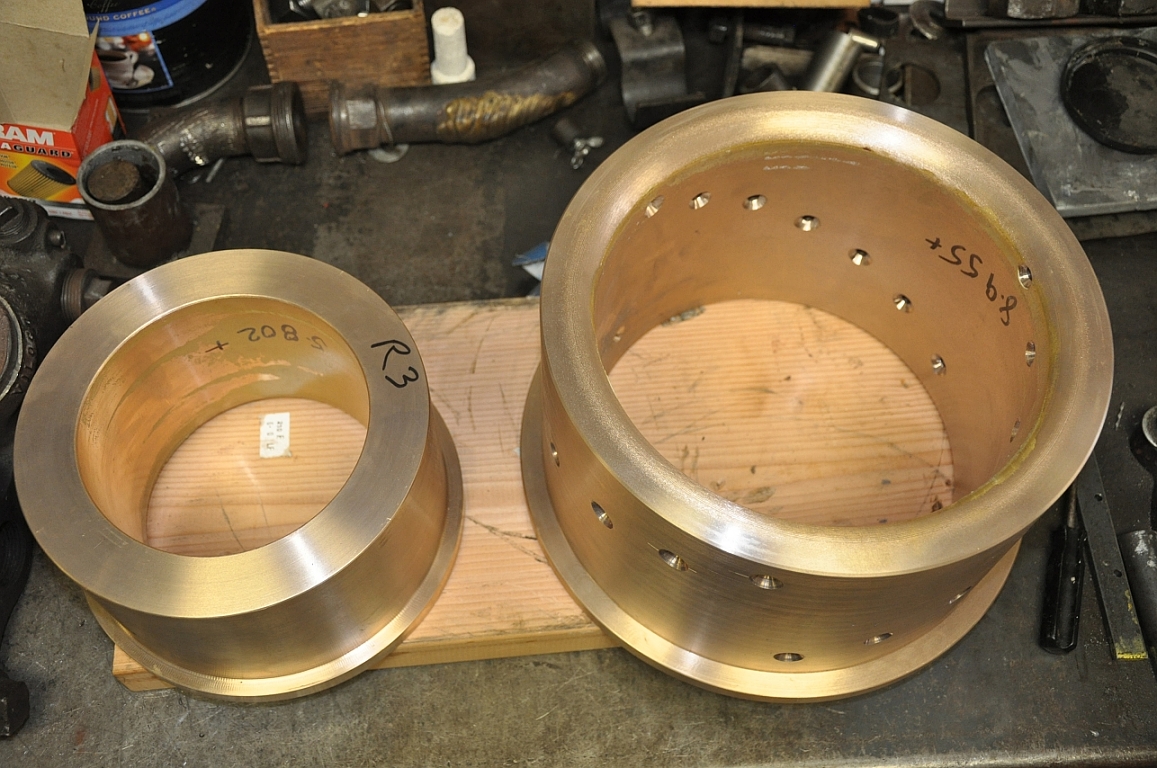
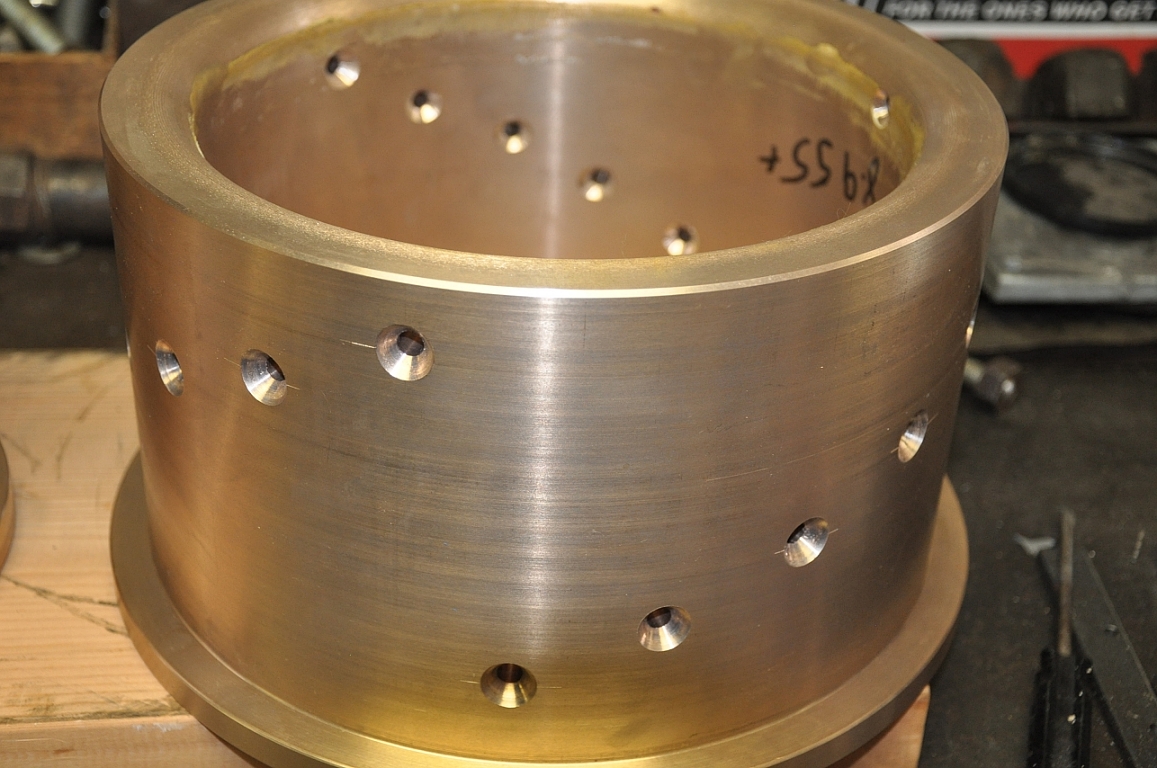
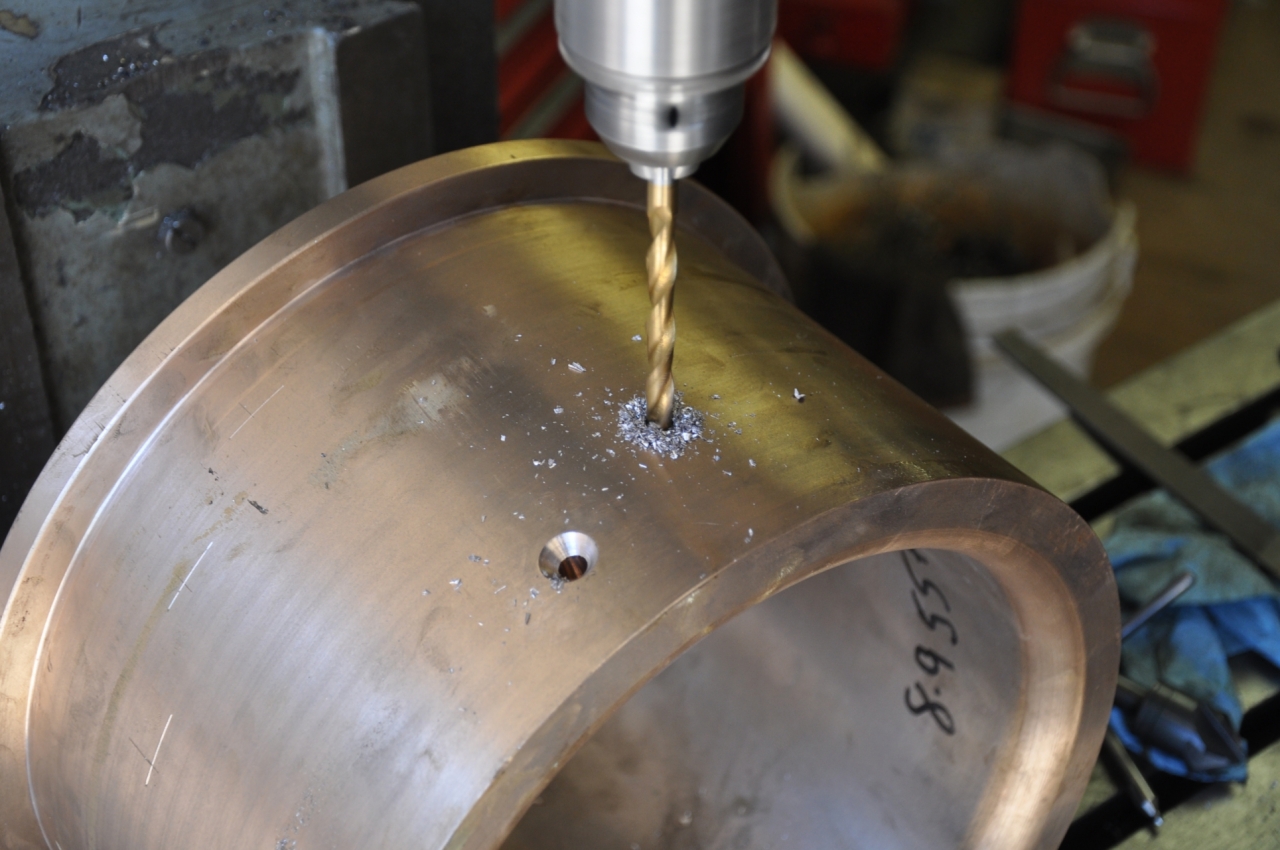
Machining of the last bushing, L2 main rod, is complete! Today we located, drilled and chamfered the 21 grease holes. With this work out of the way, the bushing was again test fit. Next Saturday morning the left main rod will be mounted. For those interested in observing, work should being about 9:30 AM.
Another big "Thank You!" to Karen and Jerry Lane for the grant that allowed CTRC to move a big step forward in the restoration of X-SP-2479.
Adaptors for 1/2 button head grease fittings have been machined. This will allow grease to be injected into the pins and rods during the remaining restoration period. Keeping grease in the rods will prevent corrosion from forming in the bottom of the rods.
August 17, 2013
This morning machining of the right main rod bushing was completed and the main rod installed. Installation went rather smooth. The rod will have to be removed once the pistons are installed to check limits of piston travel. It was felt that bushing and rod surfaces are better protected by storing them on the locomotive.
Bushing for L2 main rod driver pin is about 60% complete. Locating, drilling and chamfering of grease holes is next.
Art has machined two new grease fittings for the driver pins. At the moment CTRC does not own an Alemite stick grease gun. It also appears that there are no vendors for the large button head fittings previously used by SP. Art has machined an adaptor with a 1/2" button head grease fitting. We do have an pneumatic grease gun capable of pushing grease threw the pin and bushing passages. Two of these adapters were installed and tested. Looks like rods and pins can now be lubricated during the remainder of the restoration. Art is going to machine adapters for the remaining four pins.
Problems today with our portable battery charger. Some tinkering and unit was again serviceable.
We are studying a different way of attempting to roll the locomotive. There is concern that the present method of forklifts and chains is going to cause serious damage to one or both forklifts.
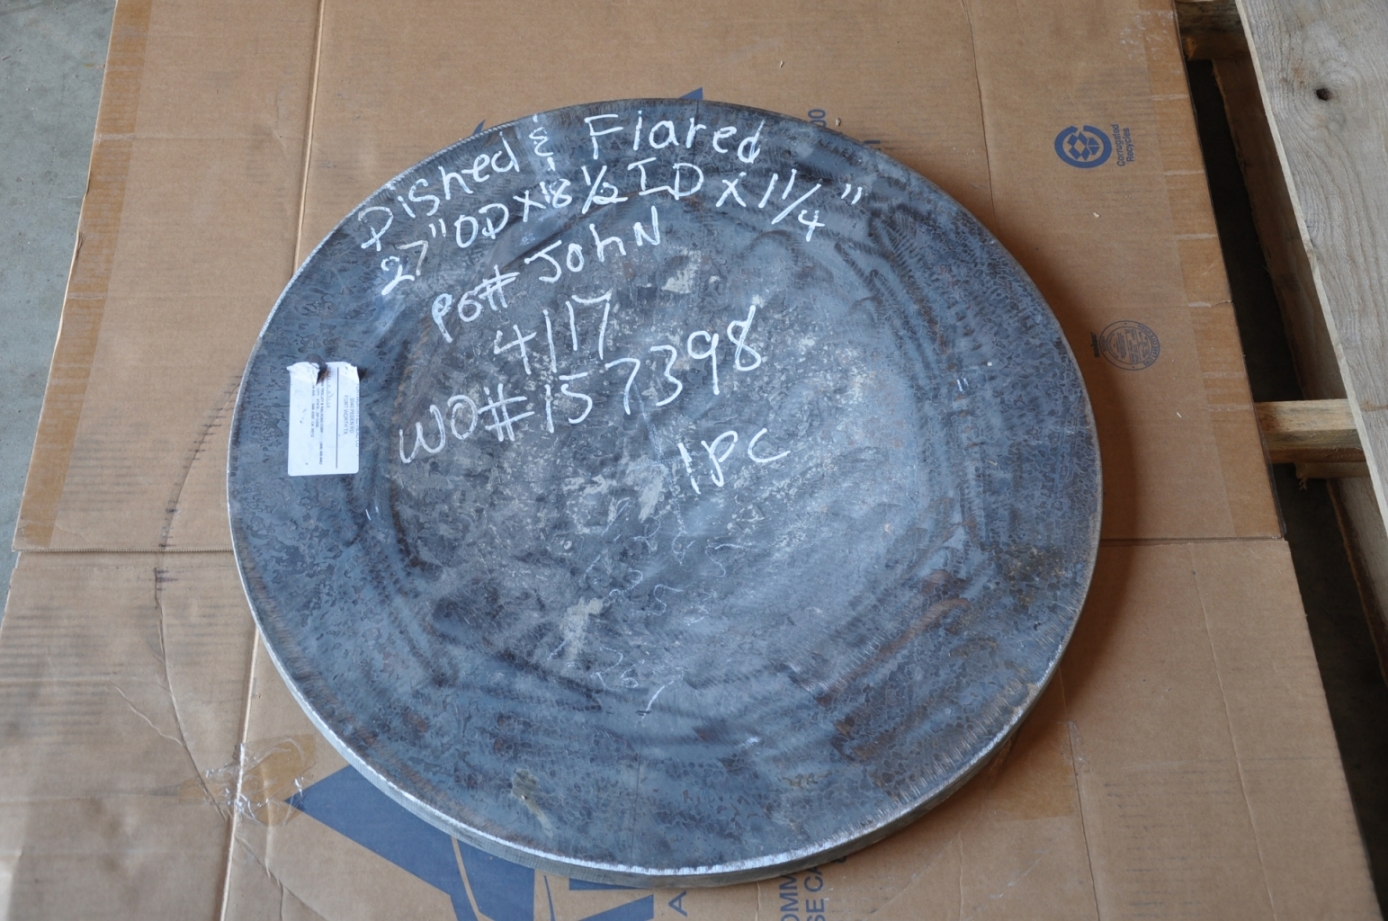
During the week material for a new steam dome cover was placed on order. Total cost for this cover is $417.00. Cover will be near identical to the present cover but heavier in all of the necessary places. Object should arrive late September.
Annual Board Meeting and BBQ - August 15, 2013
Rod Diridon
This 30th year CTRC Annual Board meeting and BBQ promise to be quite exciting. We hope to be able to announce another major successes and hope even more that you might join us for these special events.
The Board meeting is open to the public and begins at 3:00 PM in the Pacific Hotel conference room at History San Jose at Kelly Park.
The BBQ begins at 5:00 PM, Thursday August 15 and is free to CTRC supporters and a guest ... but please RSVP to Lynda (408 924 7561 or Lynda Ramirez Jones - lynda.ramirezjones@sjsu.edu) to help with the meal count.
For the 30th time Dennis DeMelloPine and the retired County Firefighters will provide the food and the Singing Conductors will again entertain.
Senator Jim Beall, new County Supervisor Cindy Chavez, and Vice Mayor Madison Nguyen will welcome you and one of our historic trolleys will be operating...a special treat for youngsters of all ages.
In the last 30 years CTRC has raised over $3 million and parlayed that into over $20 million in physical assets for the Valley including nine historic trolly's restored and construction of a mile of electrified trolley tracks and the CTRC trolley barn at History San Jose. We're nearing the completion of the rebuilding of the County's massive steam locomotive #2479 at the County Fairgrounds and have acquired three more historic locomotives and several historic rail cars in preparation for the soon-to-be-built steam railroad museum.
All of those assets have been built, maintained, and operated at no cost (with the exception of sincerely appreciated County Historic Hermitage Commission competitive grants) to the taxpayers by the phenomenal CTRC volunteers and donors who we honor on 8/15. Thanks to each of your for your continuing strong support. We look forward to being with you soon.
August 10, 2013
Machining of the last two bushings continues. 21 grease holes have been drilled and chamfered in the bushing for the right main. Chamfering of the holes on the inner surface and cutting a radius on the inside edge remain.
Machining of the left main bushing is about 50% complete. The inner and outer diameters are complete. The end of the future bushing that was clamped in the jaws of the Le Blond chuck was cut on a band saw. A bunch of work remains.
Repairs to the cab are ongoing. Welding in a section of the engineer's rain gutter continues. Some good head way was made today.
Hyster forklift has had problems with the right front tire loosing pressure. Inner tube was patched twice but leak continues. New inner tube was installed today. This little forklift is handy when heavy items have to be moved into the outside shop.
Improvements to the outside shop continue.
July 27, 2013
Movement forward on several fronts.
The bushing for the right main rod is coming along. The inside and outside diameters are complete. Bushing now must be cut on band saw, and finished. Locating and drill of the many grease holes will follow.
Cleaning of the main rods is complete. The last side was finished today.
One set of caboose steps was sanded and coat of paint applied.
During this past week, a good deal of time was allocated to the locomotive's steam dome cover. The present cover is to thin. It was noted on RYPN that the TVRR had purchased a new cover for their 4501. Contact was made with TVRR. They used the vendor that was being considered to form 2479's new cover. Cost was in the vicinity of $500. This is good news. A quote request for a new cover for 2479 will be submitted this coming week.
Museum Development - July 2013
On July 9th, 2013 CTRC members Rod Diridon, Marv Bamberg, and Larry Murchison met with Jamie L. Matthews, mayor of the City of Santa Clara and Julio J. Fuentes, the city manager to discuss a possible location for a CTRC railroad museum. The location discussed is the triangular area (east of the tracks) at the very northern end of Lafayette at the corner of Yerba Buena Way.
While no decision was reached concerning this property a request was made by CTRC to also look for some other location that might offer better acreage and railroad access. Jamie and Julio gladly accepted this challenge and will be working with Rod and Marv.
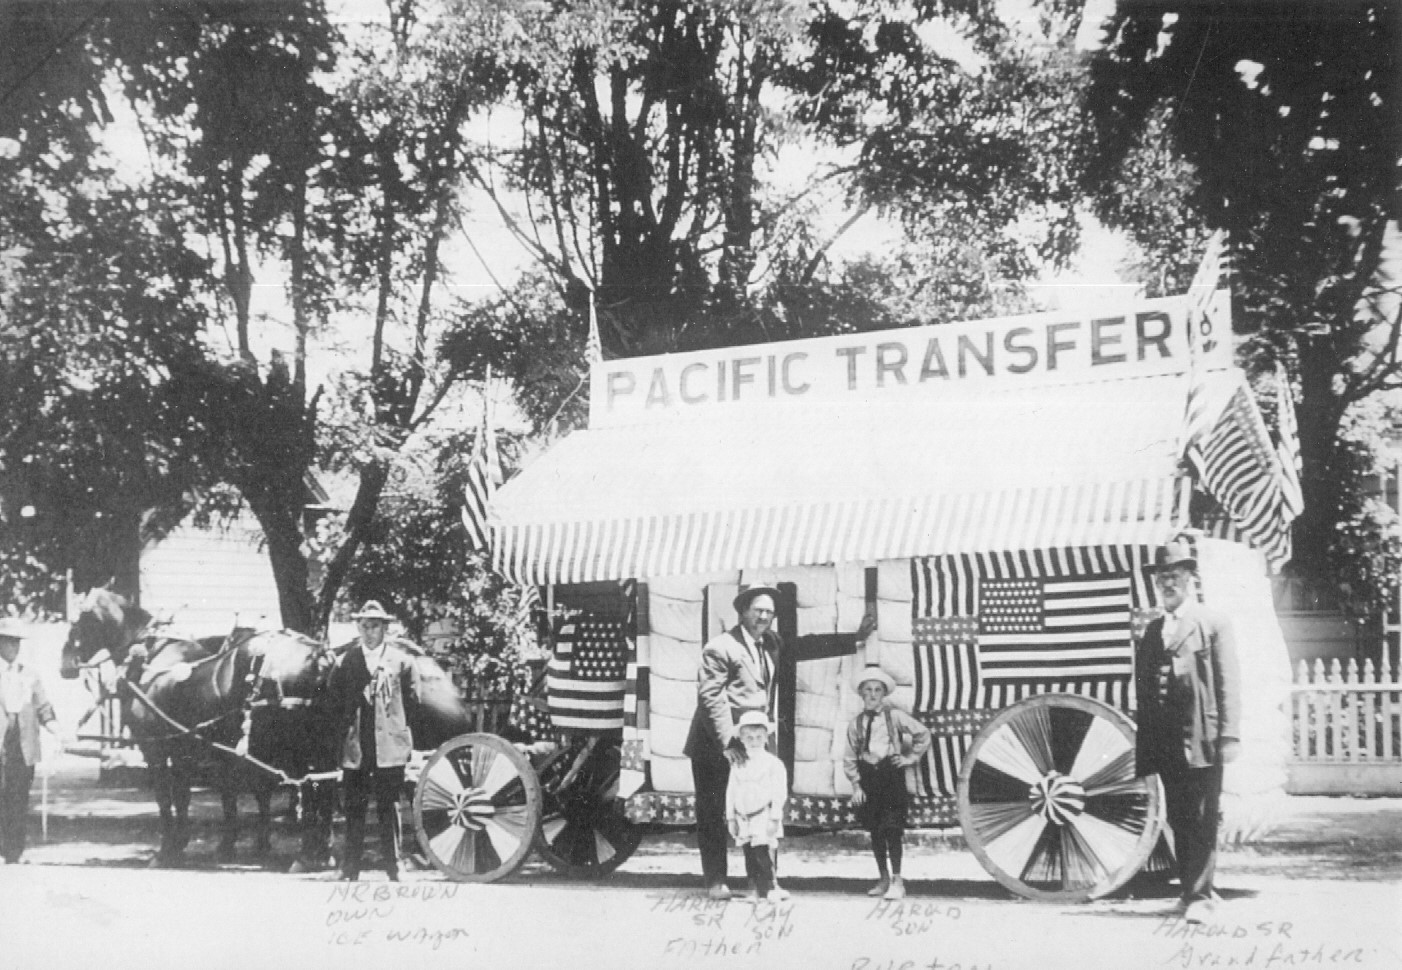
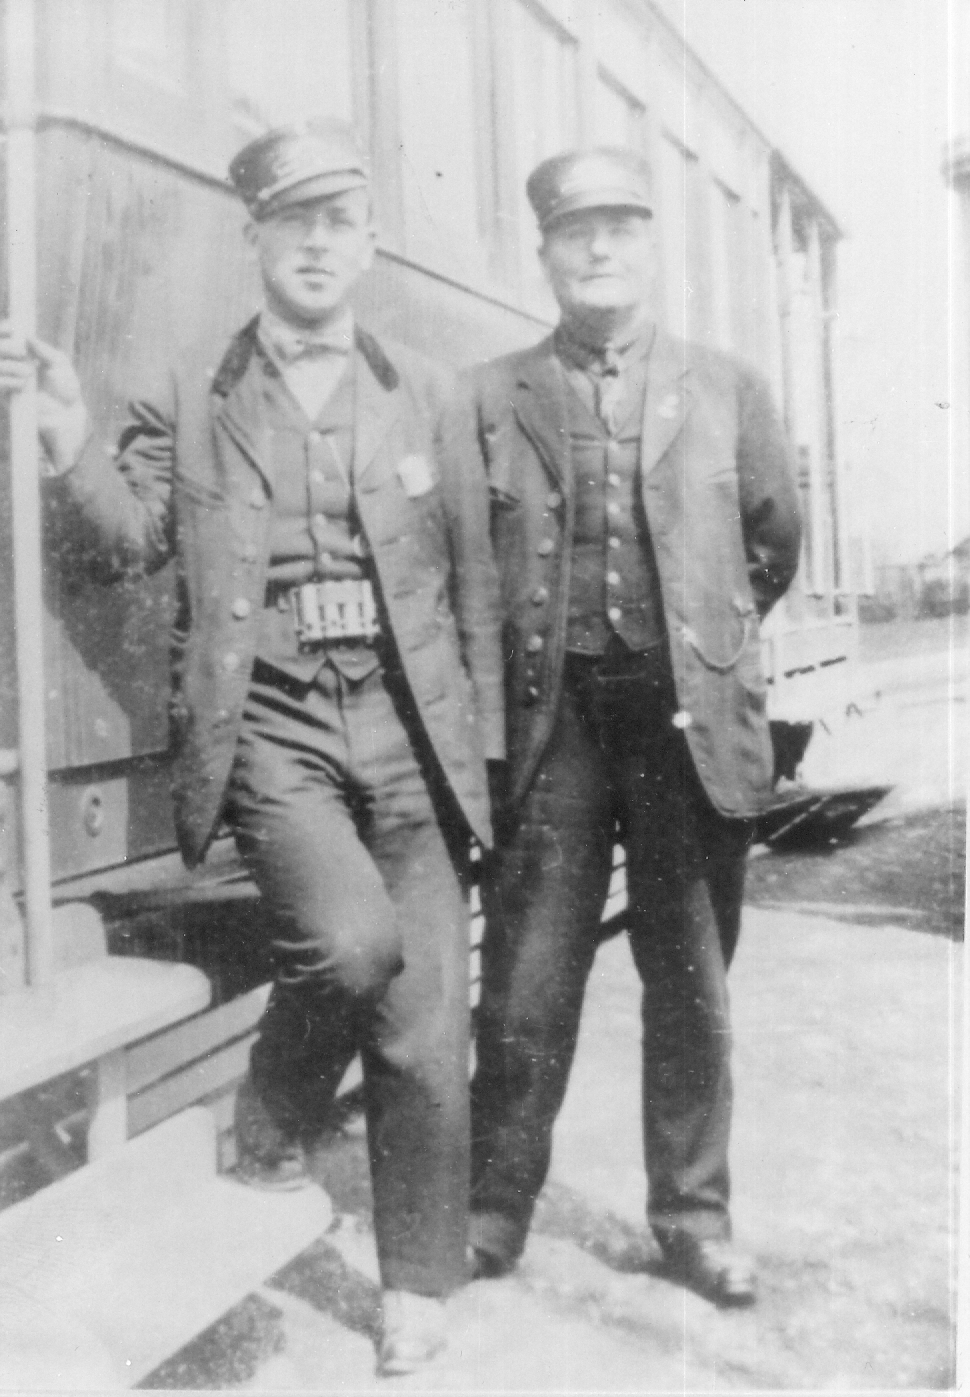
The accompanying pictures show that Jamie has a railroad background.
Top: Jamie's grandfather, great grandfather, and great, great grandfather on the Alameda.
Bottom: Jamie's grandfather as conductor of original trolley Franklin St.
June 29, 2013
100 degree temps only slowed us down a little!
Machining of the bushing for the left rear side rod number 3 driver was completed during the week. This morning it was pressed into place. Measurements were then taken to determine if the buffering ring was of the proper width. Unfortunately the bushing was to long.
The buffering ring prevents the bushing from being pressed out of position in the rod/bushing come in contact with the washer which is between the rod and nut. If the bushing moves it will wear inside the rod and eventually become sloppy in the rod. The buffering ring is pressed on the end of the bushing. If fit is proper, the end of the bushing should be slightly lower inside the ring.
With the bushing being to long, it was pressed out and trimmed. Bushing was then pressed back into the rod. Buffering ring pressed into place. Rod was then moved to the locomotive.
There were no issues getting number 3 pin to accept the rod. Problems came about with alignment of the front end of the rear rod to the knuckle at the rear of the front side rod. Number 3 driver was needed to come forward about one eighty of inch.
A 20 ton bottle jack was set between the locomotive frame and a large spoke. Heavy gear oil was brushed between the rail and wheel. Jack was then used to rotate the wheel a very small amount. Surprisingly the wheel did rotate rather easily considering the weight the wheel bears!
There was a bit of "house" keeping performed. Securing of the galvanized steel sheets that were hung on the front shop doors was completed. This coming week a coat of primer may be applied. The back wall of the outside shop will now be covered with the remaining galvanized material. Presently a large plastic tarp covers this area. This tarp is about to fail and would be expensive to replace.
June 26 Update
Saturday the crew was not able to insert L2's bushing onto its pin/into the rod. It was thought the wheel was possibly out of position.
This morning I thought I would get a head start on the weekend by taking a measurements between the L2 pin and rod. With this data it could be determined which direction and how far the wheel would have to be moved.
To help make the task easier I machined a piece of 7/8" round stock down to a dimension .002" smaller than the clearance between the wheel's pin and rod. A bottle jack was used to raise the rod off the wheel's pin. The machined piece was inserted at the top of the pin and the rod lowered on to the machined piece. The rod was then raised a very small amount to allow the machined piece to be removed. Measurements were then taken at the cardinal points using a small spring caliper. There were no significant differences between the four points.
At this point, I tried to insert the bushing onto the pin and into the rod.
SP2479 Saturday, June 22
John Ezovski
Lots accomplished this week.
Machining of the bushing for the main pin of left front side rod (L2) completed. The rod was installed on the front pin. Attempt at pushing the L2 bushing into the rod and on the pin failed. It looks as if the number 2 drive must be moved forward a very small amount. Slipping the driver forward was left for next week.
The blank that will become the bushing for the left rear side rod number 3 driver (L3) was set in the trolley barn's Le Blond lathe. This coming week machining of this bushing will begin.
The feed water heater and air pump were inspected. These objects were placed inside a small garden shed several years ago. Both units are in good shape with no evidence of corrosion. Polished piston rods were coated in oil and crates secured in the shed.
The two 6 foot long 8 foot tall doors at the back of the outside shop were cleaned, primed and painted. These doors were covered with the remnants of a garden shed about two years ago. These pieces of sheet steel were a number of different paint colors which did not look very nice. From the Old Tully Road, these doors now look pretty good.
There are two similar doors are on the opposite end of the outside shop. Until recently these doors were covered with plastic tarps. Tarps were removed due to their deterioration. A stack of various lengths of used galvanized corrugated sheet steel has been obtained at a good price (free). The front doors to the outside shop are now covered with this used material. In the future, the doors will also be painted.
Thanks to all that participated.
SP2479 June 15
John Ezovski

The day began by installing the right front side rod. Expectation was not high at being successful. There was no way to predict the position of driver 1 and 2 to each other. The drivers were install with the old bushings in place. Since these old bushings were sloppy on all pins, it was thought that pin position to each other may be slightly off. The rod was pushed into place on the front pin. When it came time to push the main pin's floating bushing into place, all were rather surprised when the bushing slid into place with minimal effort!
Next the R3 bushing was pressed into the rod and the rod installed. The only issue to be resolved is alignment of the knuckle pin's nut to the locking rod grooves, otherwise work on the right side rod set is complete.
Machining of L2 bushing for the left front side rod will begin this week.
SP2479 - June 7
John Ezovski
Rod bushing work is moving forward. The three right side rod bushings are finished. Next week R3 bushing will be pressed into its rod. R2 bushing is a floating bushing. It simply slides into place assuming the driver pins are in the correct position.
The R3 bushing required about 11 hours of machine time. R2 bushing required signficantly more time because of the grease holes. Each hole is precisely located, then drilled followed by chamfering on both sides. Close to 24 hours of work was needed to get the bushing to its finished state.
Repairs to the cab are on going. Presently damaged sections of the "rain gutters" are being carefully cut away. When this work is complete, new material will be welded into place.
Lots of grass cutting and tree pruning. Site looks pretty good.
SP2479 - June 1
John Ezovski
Lots of rod bushing work. By far the most significant completed task was locating 21 grease holes in the bushing for the right side's front side rod main pin or R2.
All of the main pin bushings float on the pin and in the rod. Grease is injected threw the middle of the pin and out threw several grease passages in the pin to surface of the pin. This grease then passes threw these holes to lubricate the area between the rod and the bushing. These grease passages are laid out in a precise manner which allows for grease to be dispersed to the entire area between the pin and the bushing.
Work on the bushing for the right side's front side rod number 1 driver pin or R1 was completed. The final piece, a ring which prevents the bushing from being pressed out of the rod during operation, was pressed into place.
Next bushing to be cut will be for the right rear side rod for number 3 driver pin or R3. The blank was mounted in the Le Blond lathe at the trolley barn. Machining of this bushing will begin this coming week.
There is much work to be performed on the cab. All surfaces require cleaning and painting and is on going. Several small areas of the "rain gutters" over the cab windows are in need of significant help. Those repairs began today.
The absence of rain has reduced growth of grass and weeds, however, the site was looking a bit rough. Lawn mowers were put to work but there is more work here.
Status - May 25, 2013
John Ezovski
Machining of rod bushings continues. Driver #2's bushing for the side rod is coming along. All that remains of the work on the Le Blond is finishing of the bushing's flange end. Once that work is complete, the bushing will be moved to the restoration site and grease holes will be located and drilled. Lots of work here.
Today the right front side rod was test fit. On initial attempt at mounting the rod, number one driver pin would not accept the rod. This was expected.
During the week, the bushing was pressed into place and the inside diameter of the bushing measured. The inside diameter of the bushing shrunk a considerable amount. Dimensions of the pin were checked. It was doubtful at the time that the pin would accept the rod.
The bushing was pushed out, machined and pressed back into place. Rod slid onto pin, as it should, with minimal effort.
Status - May 18, 2013
John Ezovski
Lots accomplished yesterday.
Machining of the front, right (R1) rod bushing was completed. Two of eight bushings are now complete. Because of the time of day, the bushing was not pressed into the rod. That work should be complete next Saturday. The next bushing to be machined will be for the front side rod, main pin.
Some pad welding on firebox roof sheet was also completed. Two areas are complete and one partially finished. There is one more large and one small area remaining. Next week the completed areas will be measured for thickness and Form 19's generated.
Clean up of the cab's exterior surfaces has begun. Because the cab has sat for a very long period with primer only on the exterior surfaces, the entire exterior must be wire wheeled. Cleaned surfaces are then covered with primer. Paint will follow.
Thanks to all that participated.
SP2479 Saturday May 4
John Ezovski
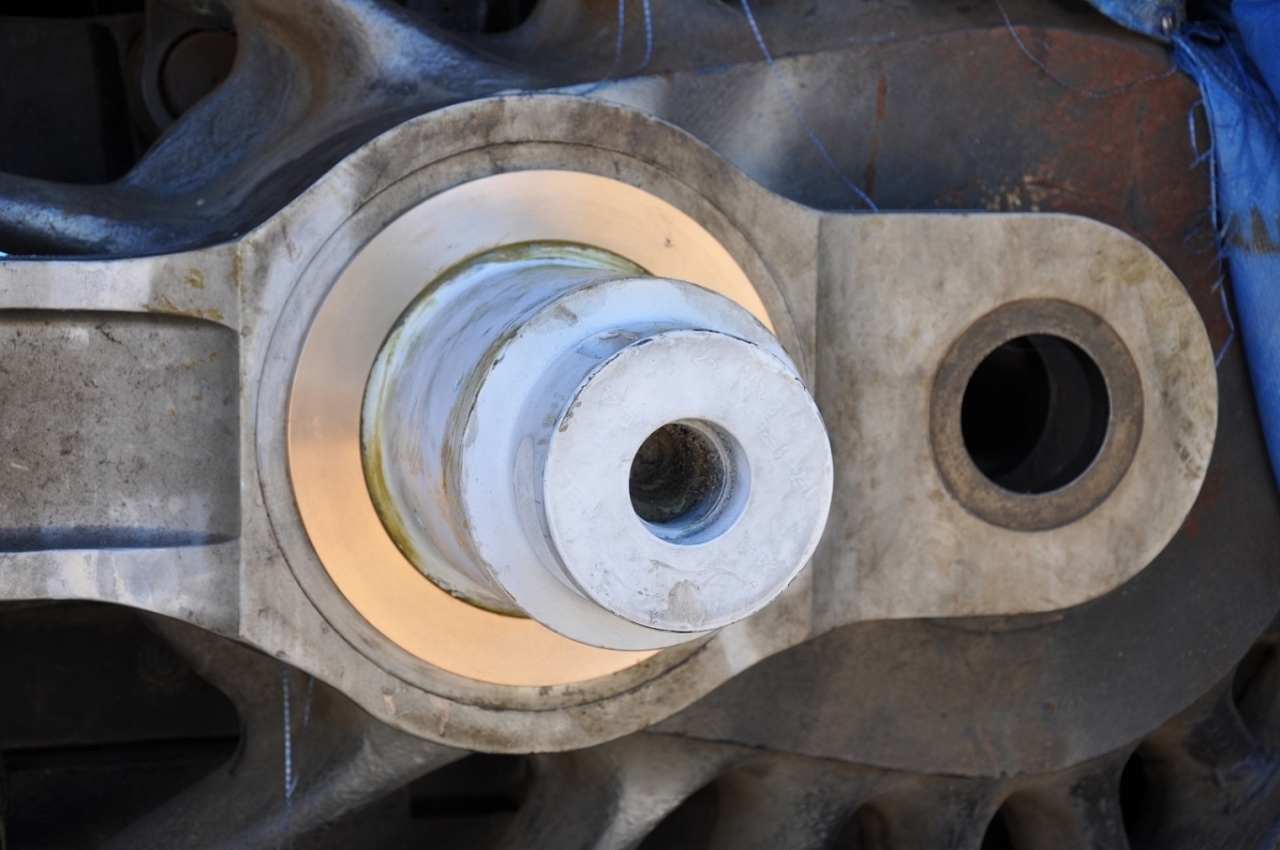
Machining of the first rod bushing, L1, is now complete. Cutting a convex radius at the entrance to the inside diameter was the last step )see image-1). This radius matches the concave radius at the wheel end of the driver's pin. The bushing is seen sitting nicely on it's pin in image-2. Next the bushing will be pressed into its rod. Before this can happen several things must occur.
First the rod must be moved from its storage spot in the trolley barn. This man take place this coming week. Our large hydraulic press in the outside shop will be used to insert the bushing. The little Hyster forklift is needed to carry the rod to the press. Today the right front tire on this machine was found flat. Location of the leak was identified. This coming week the inner tube will be patched. Hopefully the little forklift will be ready next Saturday.
Once the bushing is in place, a thrust ring will be press on the non-flange end. This ring prevents the bushing from being pushed out by the rod's retaining nut during operation. Some machining to the thrust ring may be required. With this work finished, the rod will be returned to its proper home!
Machining of the rod bushing for the right side number 1 driver pin is well under way. Work on this pin should be complete in the next one to two weeks. This is dependent upon how things go with the first bushing. The next large piece of bronze to see the Le Blond lathe will be for the bushing for the left front rod number 2 pin. It was decided that work on the left front rod will be completed first. We will then repeat with the process for the right front rod. There are many weeks of work in front of us.
While rod bushings are in work, there is another big task waiting. Most know that the cab is now at the restoration site. Work on restoring/repairing the cab can begin once a detailed plan is created. Those that are looking for a task, here it is!
Also today, the locomotive and tender were rolled to keep journal surfaces from corrosion.
SP2479 Update - March/April 2013
John Ezovski
For those that may not be aware, there is a facebook page for SP2479. We are averaging about 200 hits on each update. The link to to the facebook page is: http://www.facebook.com/pages/Southern-Pacific-2479-Steam-Locomotive/159989580109
April 27
Bushing for the rod/pin on the number one driver, left side is nearly complete. All that remains is to cut a radius on the inside diameter of the flange end to fit the pin. Machining of the next bushing has begun.
Today most of the pipe mounted on the tender for the train brake air line was removed and inspected for wear. It was felt that this was necessary when a large hole was found in the tender's brake line. At least one small area requires pad welding to return this line to service.
More grass was cutting at the restoration site!
This morning the locomotive's cab was moved from trolley barn to locomotive restoration site.
Prior to any work being performed on the cab, a restoration plan must be created and approved by Art, Jack/myself.
Some time back a large quantity of fir was obtained for the cab liner. This material is at the trolley barn. It will require some milling for use.
April 20
Multiple measurements of the Number 1 and 3 pins have been taken. Measurements of the outside diameter of the old bushings have also been obtained. One set of measurements of the rod bores for these pins is also complete. With this data drawings are being constructed for each bushing.
Machining of the first rod bushing continues. Inside diameter is complete. Outside diameter is in work. Trolley barn's LeBlond lathe is being used for all work. Lathe is performing well. For those wanting to see this work, the process should be under way by 10 AM most Saturdays. Clean up begins near 3 PM. Work is occasionally performed during the week but not on a set schedule.
Decision has been made to move the locomotive's cab back to the restoration site. The cab has been stored under cover for a number of years behind the trolley barn. Having the cab at the restoration site will provide work for volunteers. Yesterday the cab was loaded on to a trailer. Trailer will be towed to site in the next one to two weeks.
Clean up of SP1215 running gear continues.
April 6
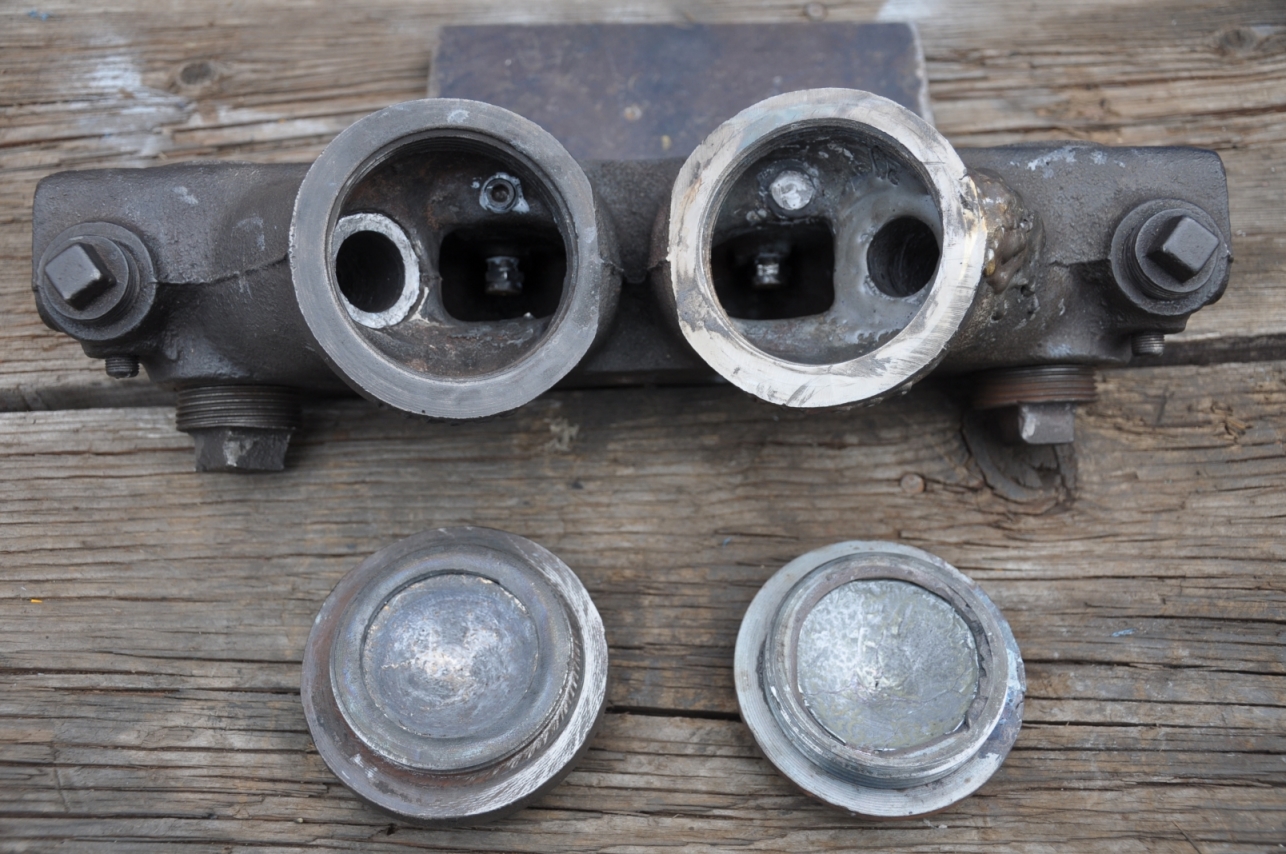
After three full months of kicking repair ideas, experiments and machining, repairs to the sanders are complete! This past week repairs to the final port were completed.
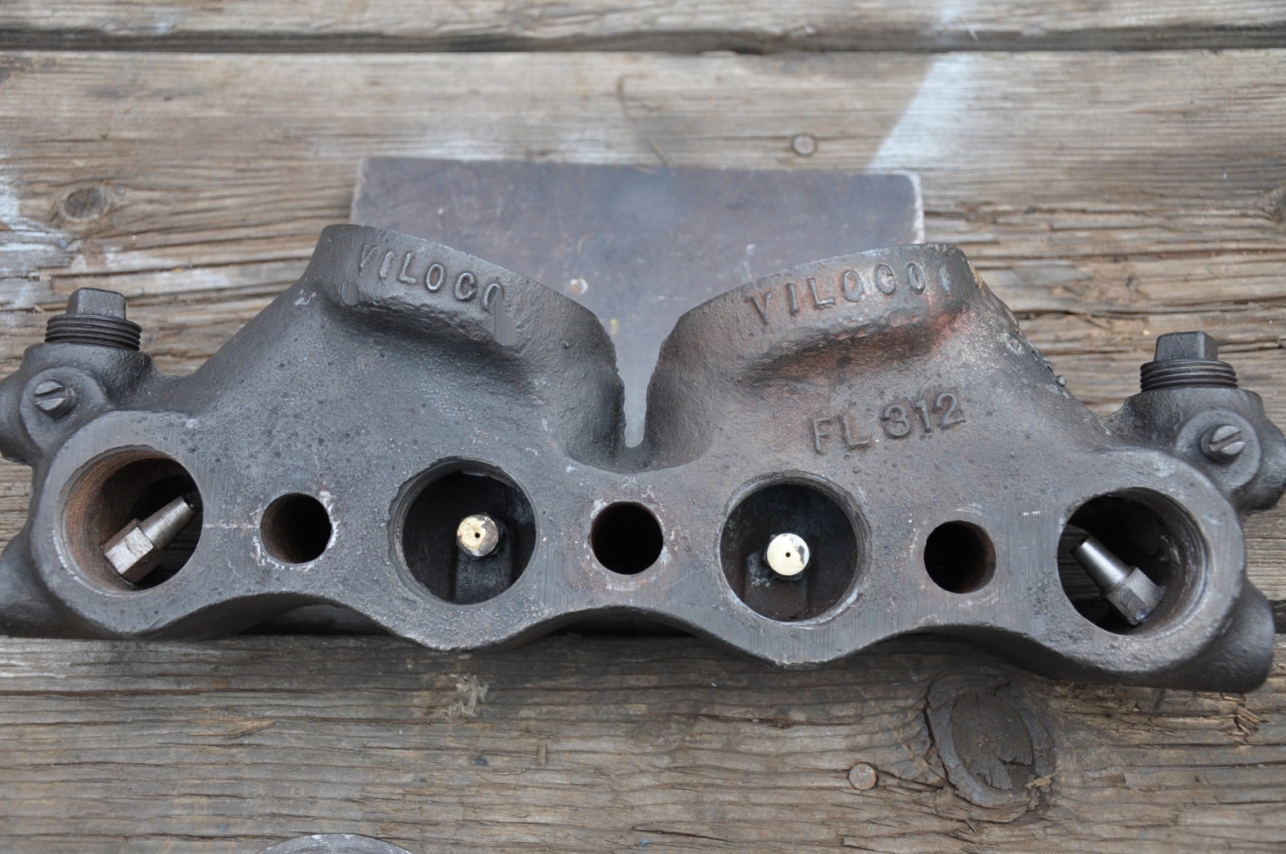
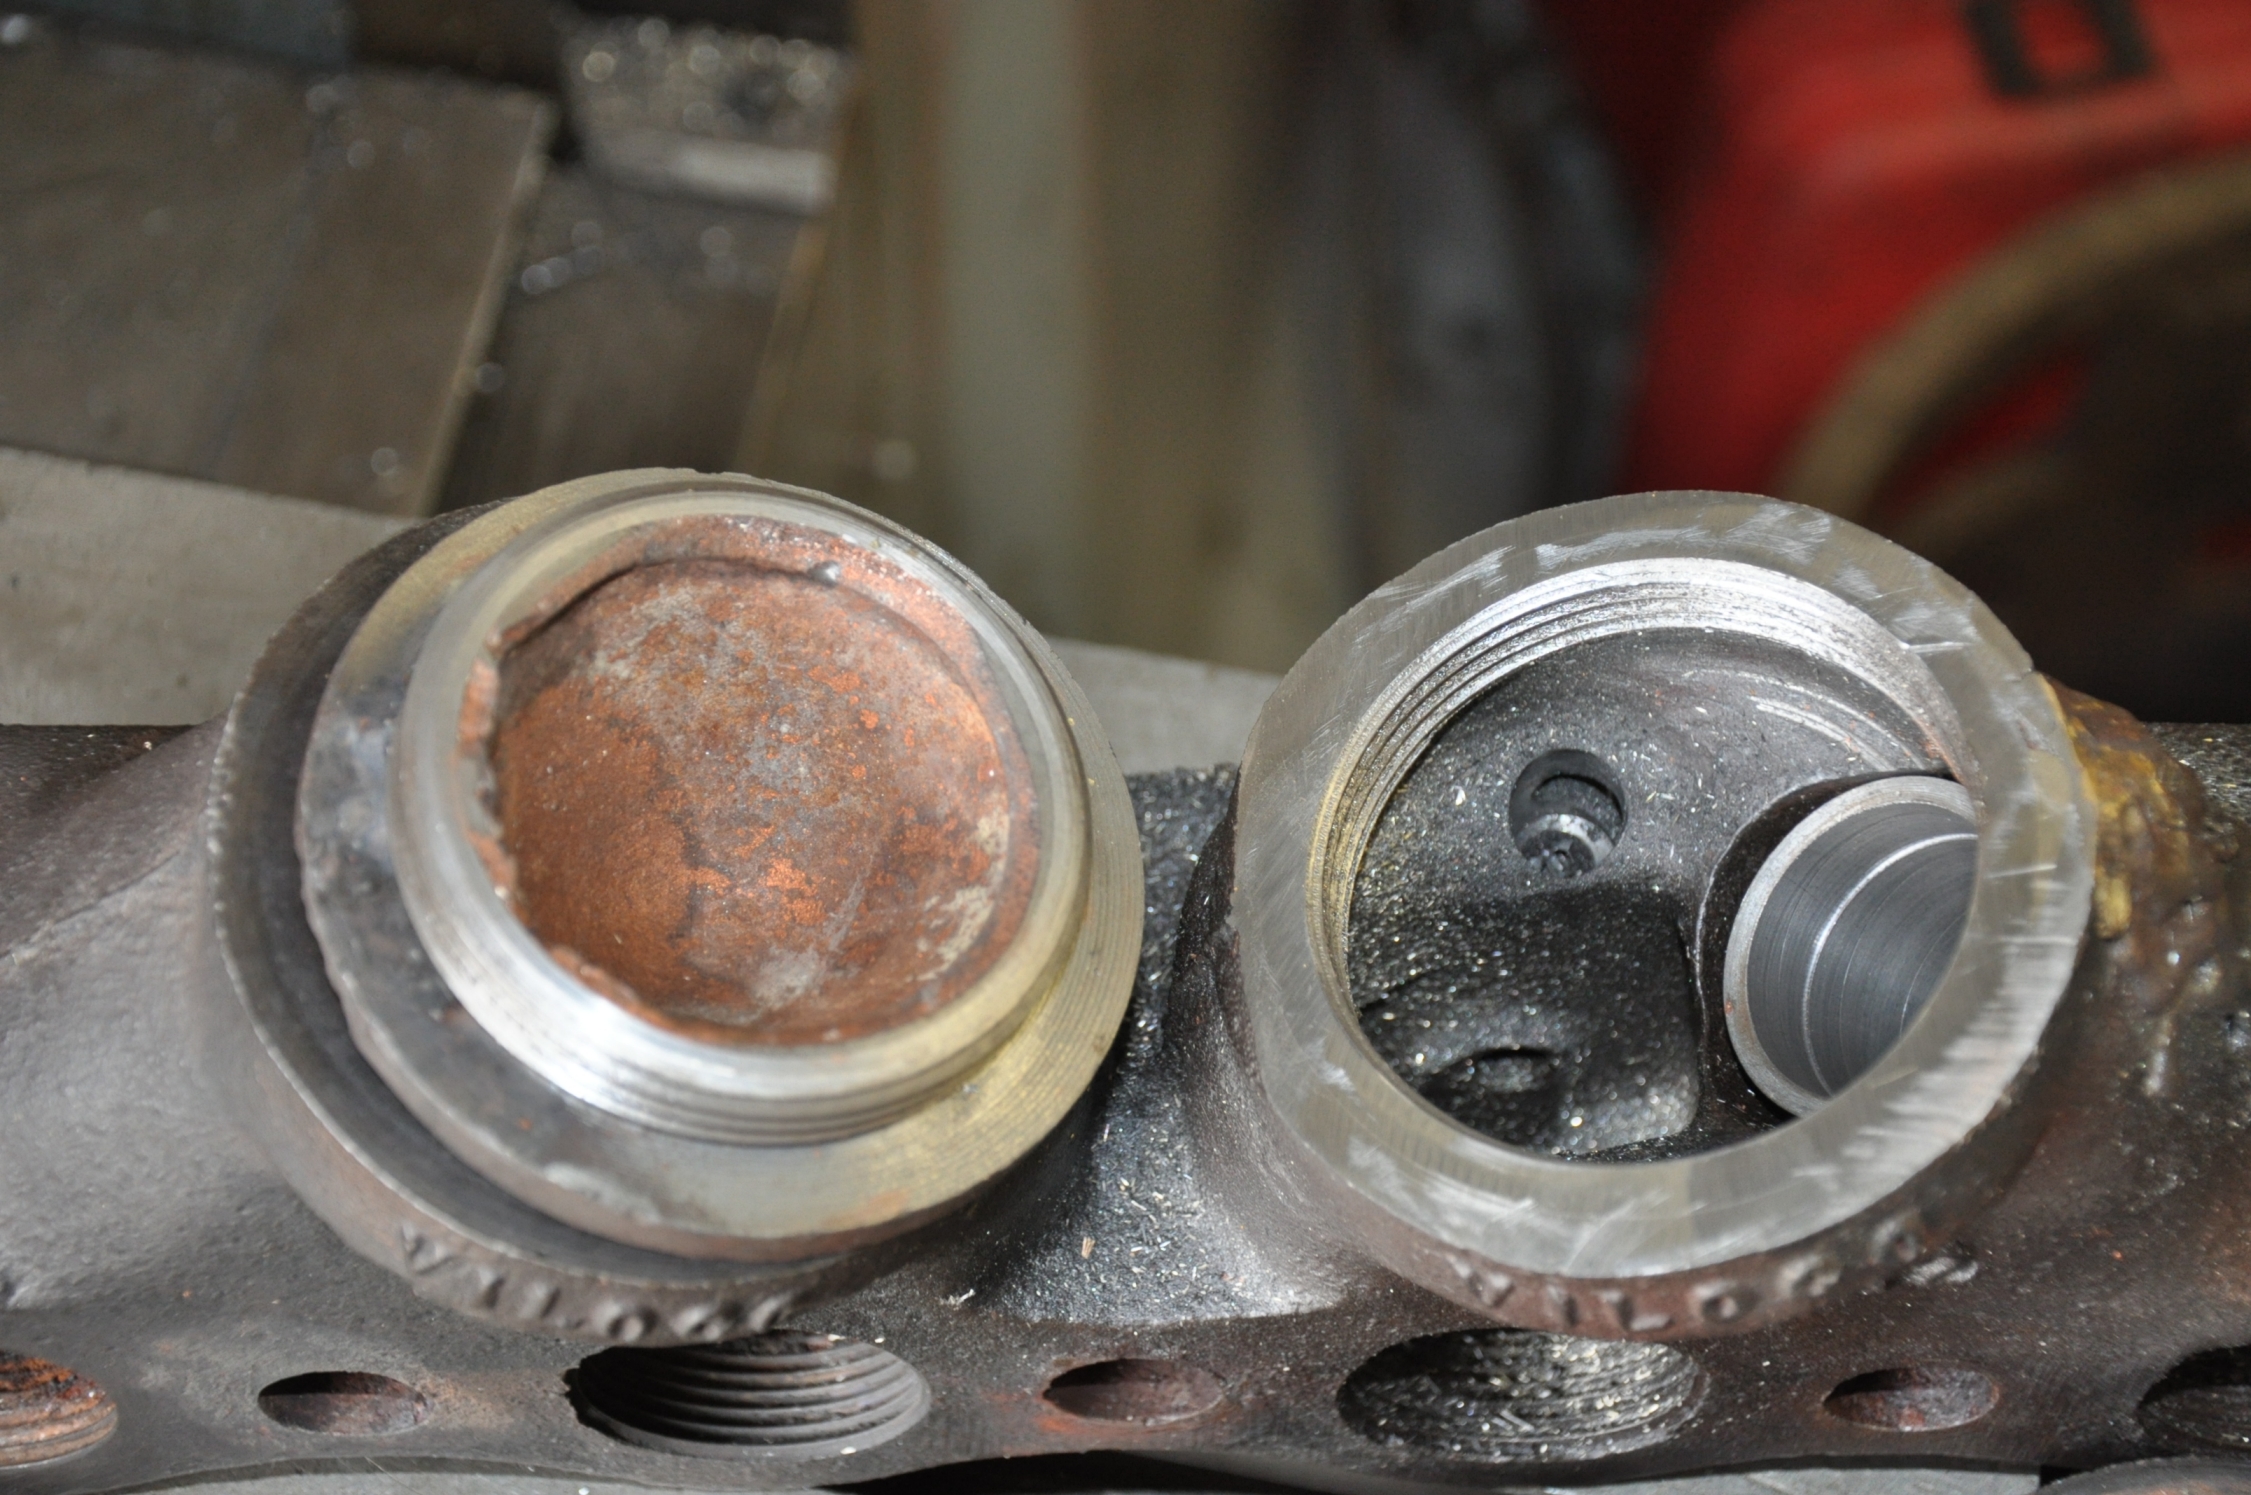
Shown to the right is the body with repaired caps. The left port required a new lead liner. The right port require a more extensive repair. Sand had cut away the lead liner and a good portion of the valve body wall that held the liner. A sleeve (bushing) was machined. Lead was then poured to fill the sleeve. The sleeve was drilled and then epoxied into place. The top of the sleeve and lead liner are obscured by the gray epoxy. Also note that there is a plug screwed into the left opening at about the 1 o'clock position in the left opening. This plug is at the 11 o'clock position in the right opening. The threads in this hole had been completely destroyed. The wall was not heavy enough to support a larger plug. The solution was to machine a plug and epoxy it into place.
This is the same valve but a side view showing new air nozzles. Both valve bodies received these.
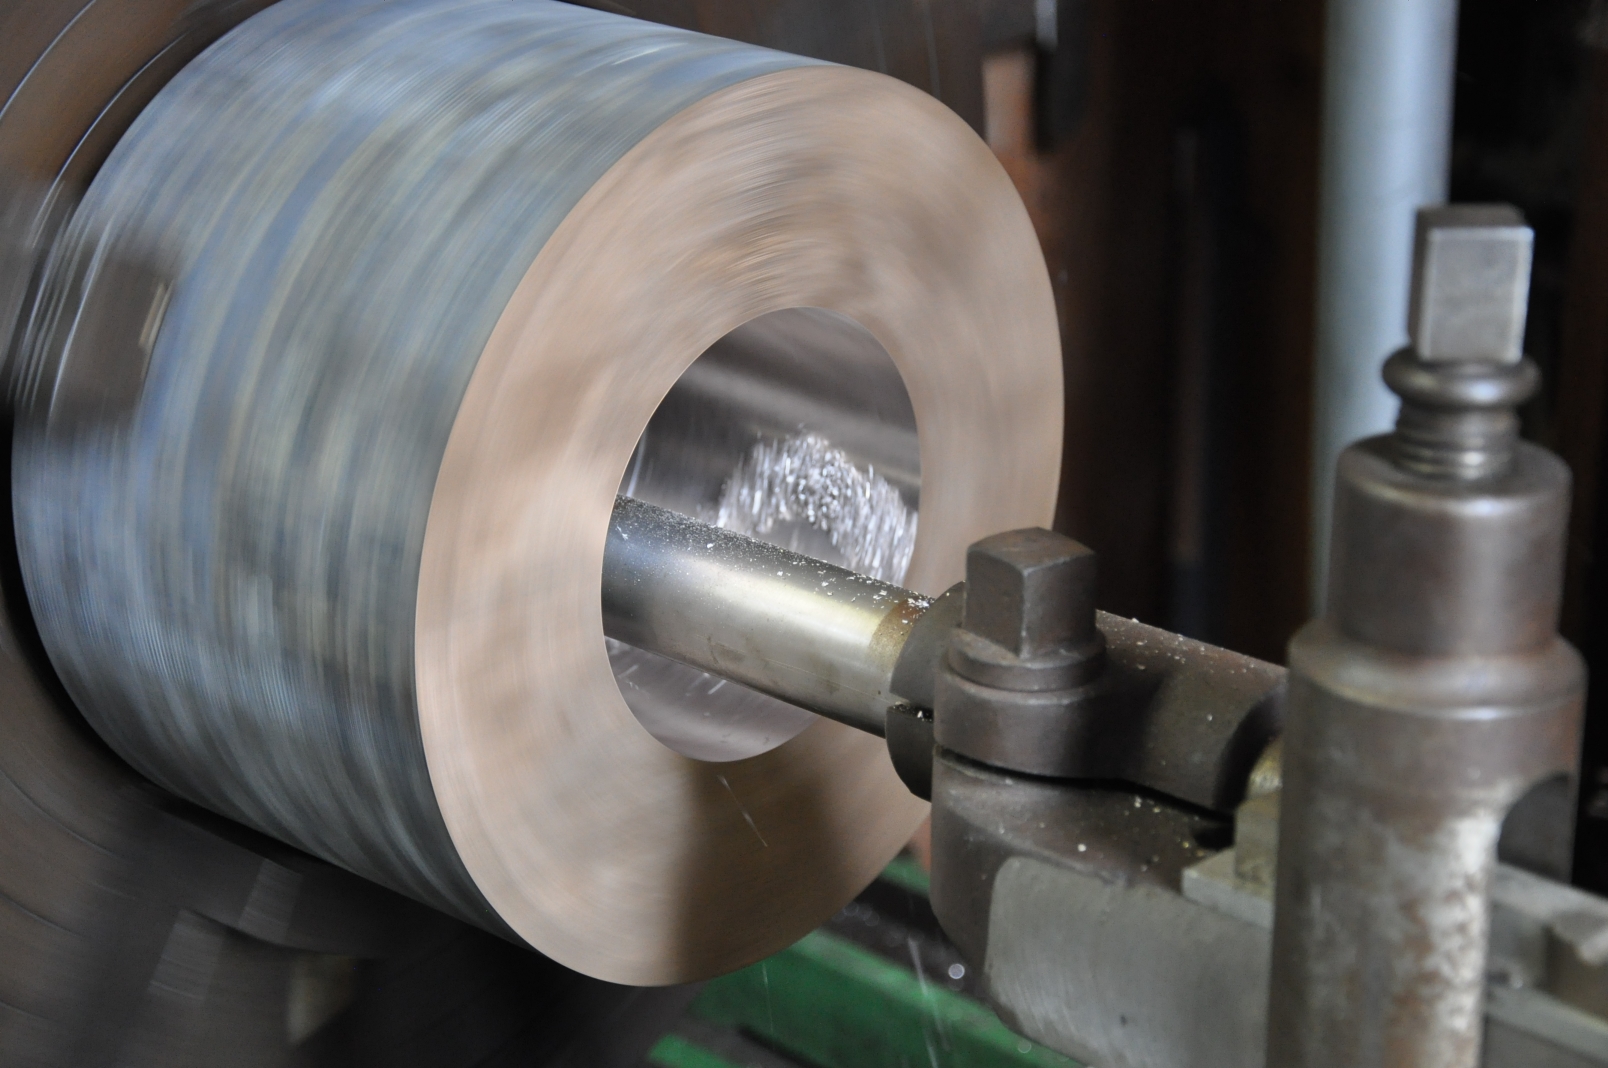
Boring begins on the first new rod bushing on the trolley barn's Leblond lathe. This work will be on going for a good number of weeks except for next Saturday as projects master mechanic will be away.
Other tasks: More grass cutting. At this time of year, its a weekly task. PM on forklifts and other equipment.
March 30
Today the fourth hole requiring lead was filled in the second sander valve. Three other holes that were filled last week were drilled. Drilling of the fourth hole was started.
The protective coating of paint that had been previously applied to pins on the right side of drivers 1 and 3 was removed and a series of measurements taken. The outside diameter and length of the old bushings for these pins were also measured. Drawings will be constructed prior to any machining.
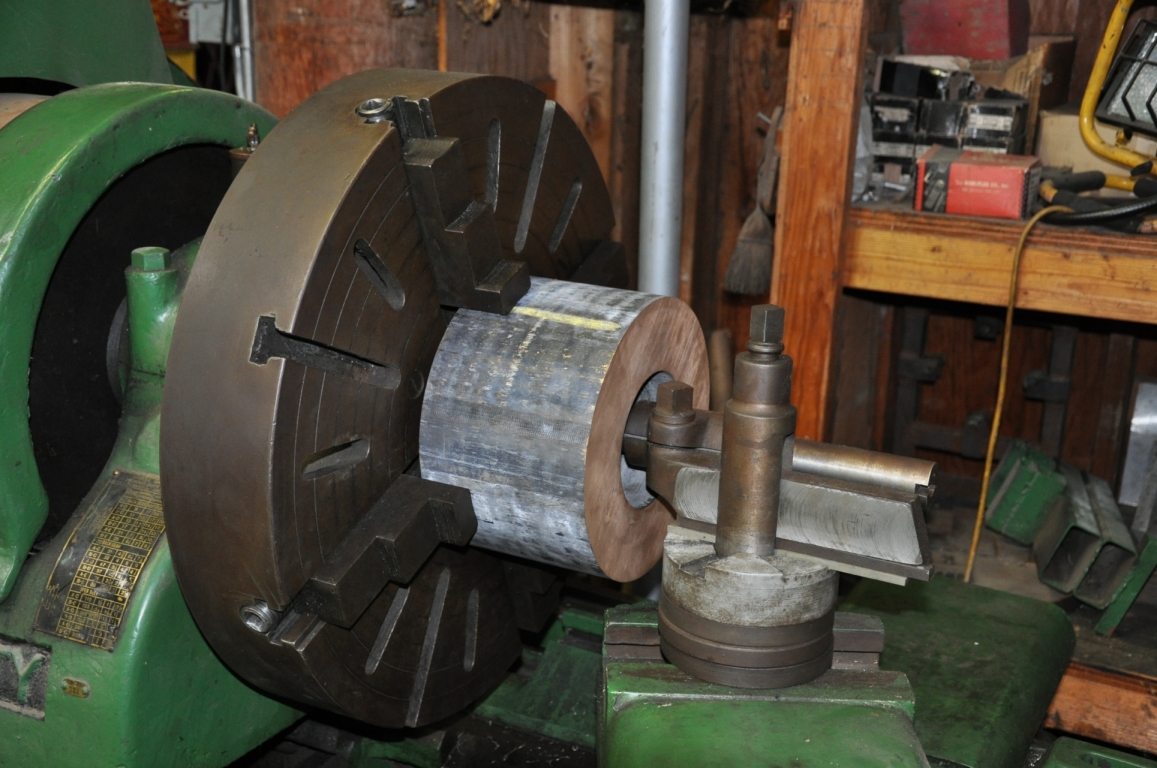
The first piece of bronze was set in place on the barn's Leblond lathe. Machining of the first bushing could begin next week.
The heavy engine hoist has been returned to the barn. The hoist is needed to mount rod bushing material on the Leblond.
All of the yesterday's crew spent a good portion of the day at trolley barn yesterday. In addition to work mentioned regarding 2479, several other things took place.
Bill and John Z. continue to beat on HSJ's yellow forklift. The beast continues to quit running after about 30 minutes of operation. I'm not sure as to the end results of their efforts.
Earlier in the week, I looked over SP1215 and found that rods and other polished metal was in need of work. Larry and Denis spent the day on this task. There is more to do here.
Also more grass cutting at restoration site.
Rod Bronze Has Arrived
John Ezovski
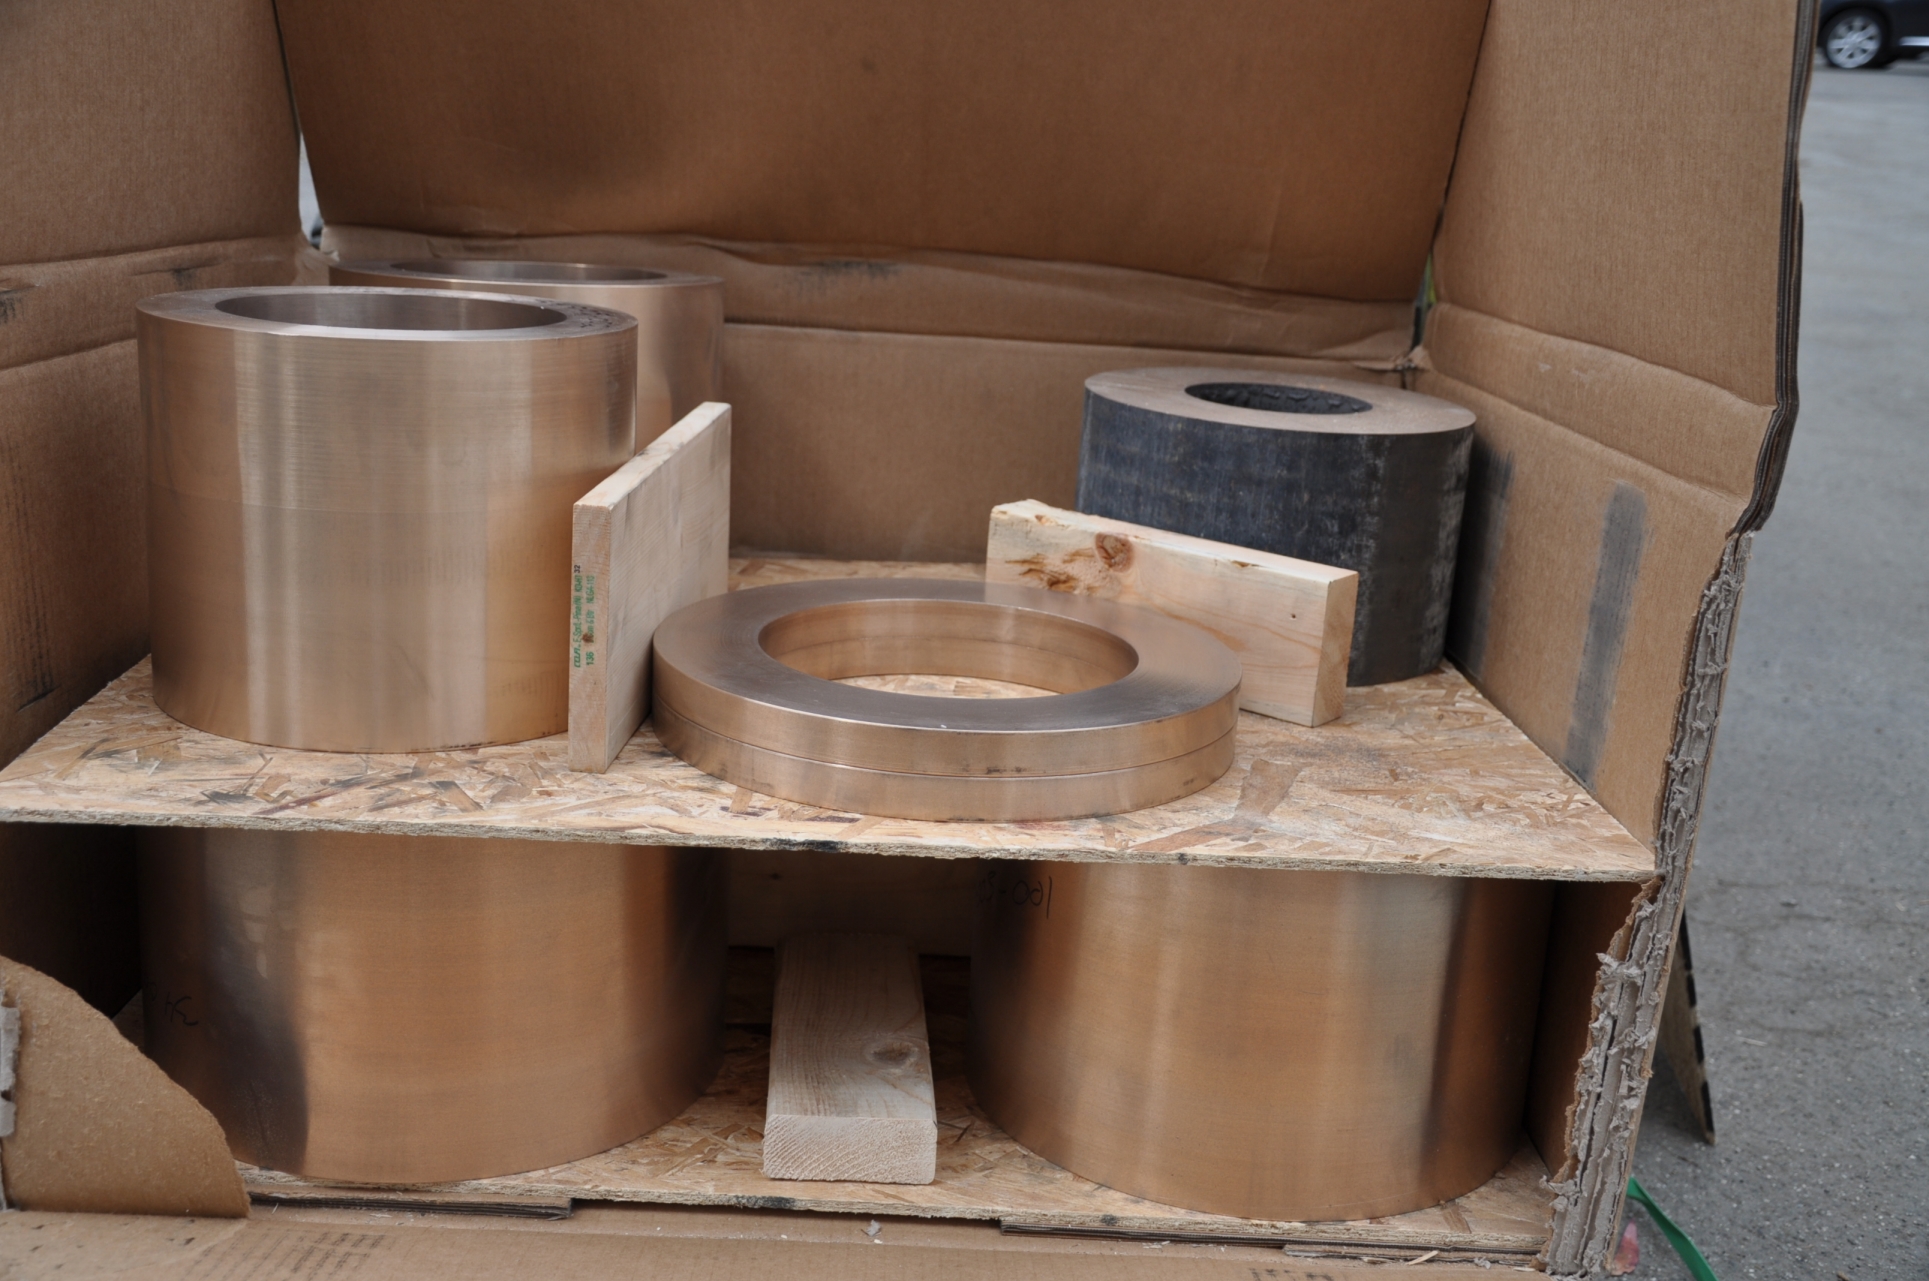
The rod bronze has arrived.
1150 pounds of bronze arrived at the trolley barn early this afternoon (March 27).
The carton was opened for inspection with no issues found. I took measurements of the material I could access (some of this stuff is pretty heavy!). Numbers I obtained easily meet those provided.
The carton is now stored in the trolley barn.
SP2479 Status - March 23, 2013
John Ezovski
Today lead was poured into three of the four sander valve body ports. A number of different methods were discussed as to how to create new lead liners for these ports. Most of these ideas required significant creativity. The final solution turns out to be the simplest: fill the hole with lead and drill out the required opening. Three of the holes have been filled. Next Saturday these holes will be drilled. If the resulting sleeve is acceptable, the fourth hole will be filled and drilled.
Rod bronze should now be on order! This week a check was mailed to the vendor. Upon receipt of check vendor was going to begin manufacturing the required material. Material should arrive towards the end of April.
Warmer weather and small amounts of rain require site grass/weeds be cut weekly. Properly operating lawn equipment is rather helpful. Site continues to look good.
March 2
Repairs to the damaged sander continue.
This week the cap with the severely damaged was repaired.
After a lengthy discussion it was felt that a repair similar to that performed on the valve body was best. The cap was mounted in lathe to cut away remaining threads. A bushing was then machined with threads on its OD. The Bushing was pressed into place to finish the repair.
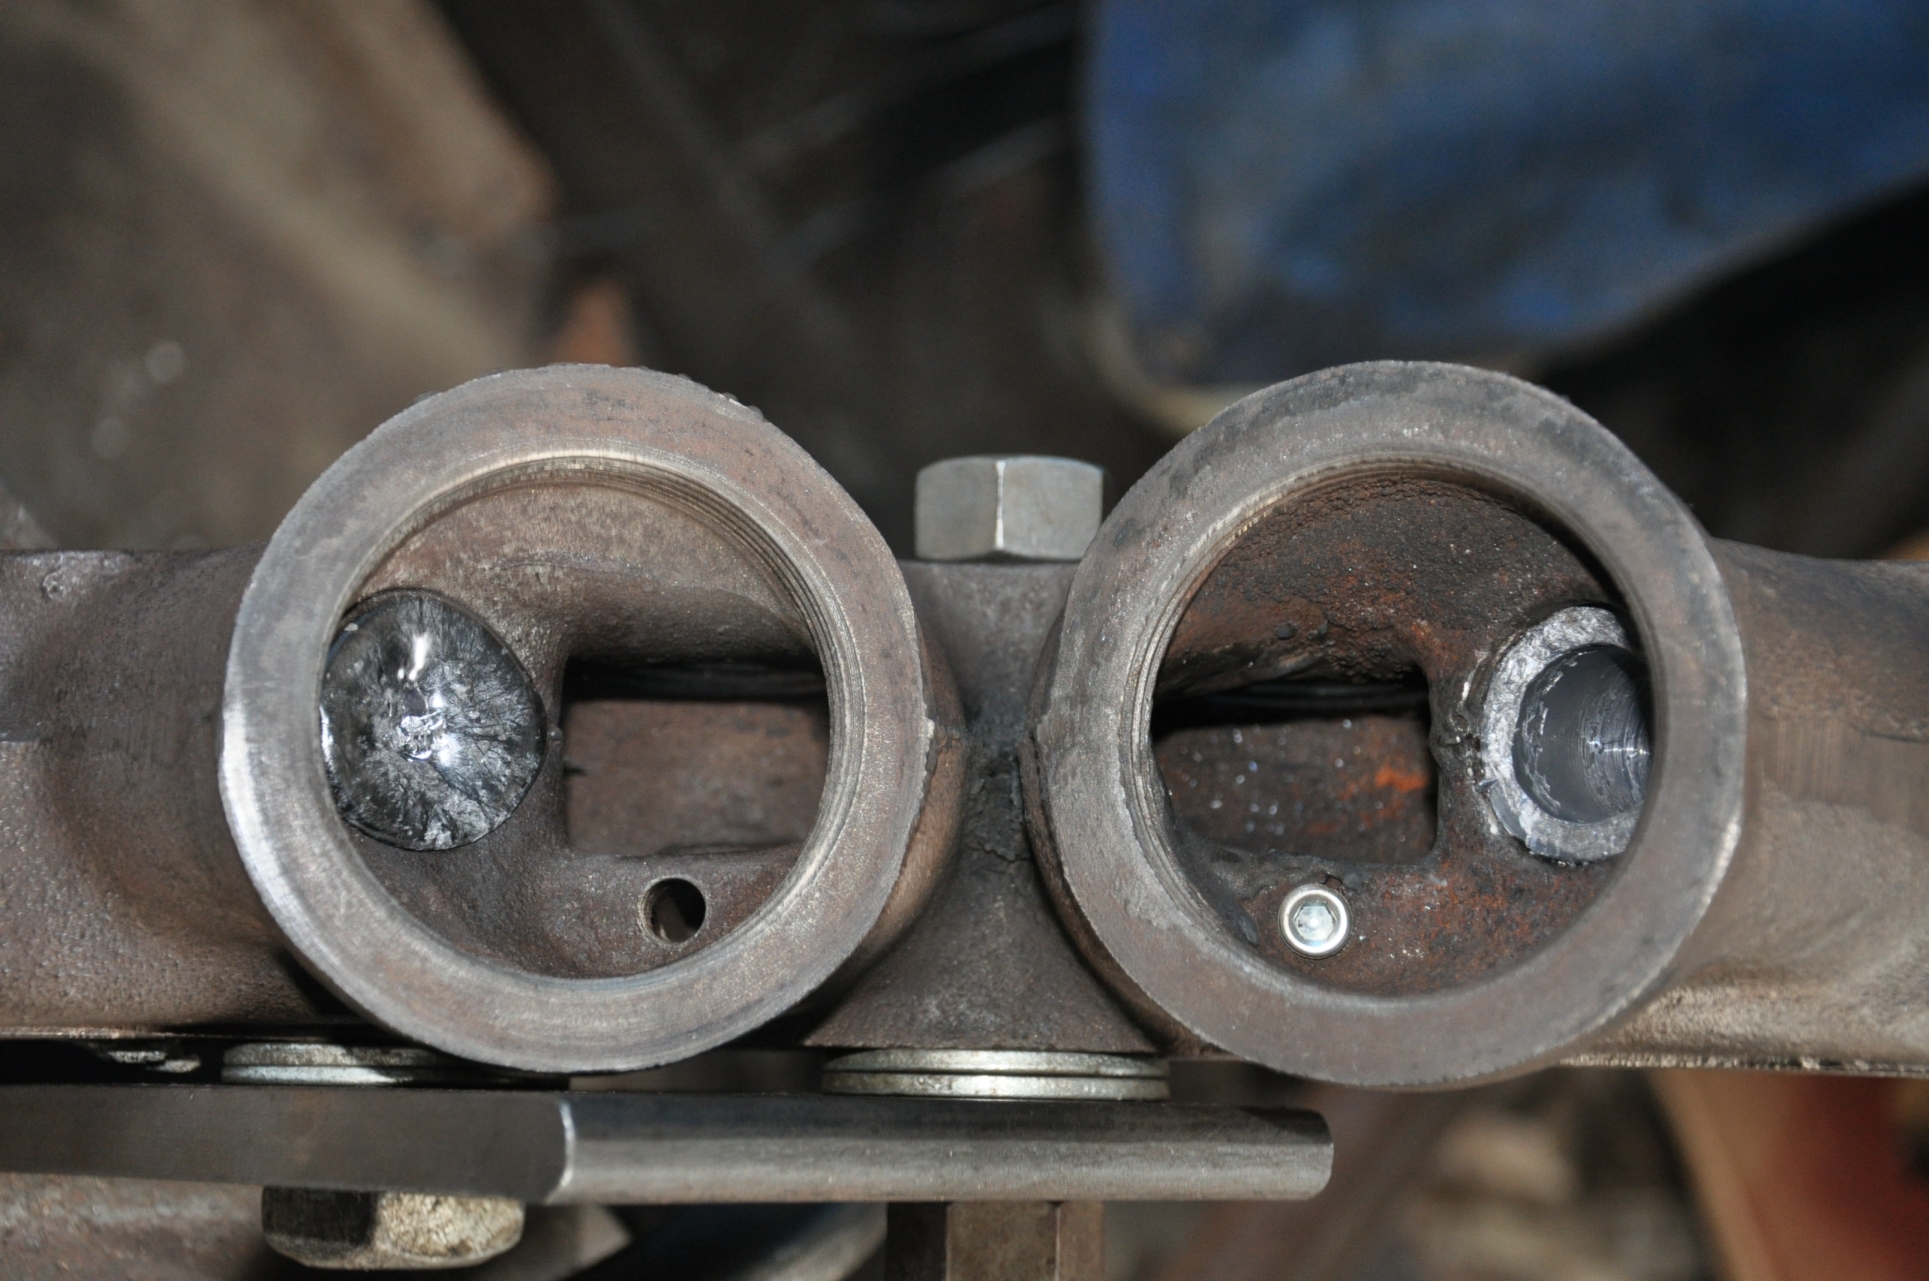
In the attached image the repaired cap is inverted in left passage. The repaired threads in valve body are on right. The sand passage is heavily worn. A sleeve can be seen inserted in the passage. This sleeve will be epoxied in place at a later date.
SP2479 Progress Feb 16, 2013
John Ezovski
A bit of machining on sander valve on Bridgeport. An attempt was made to mount valve on Leblond lathe. Issues were encounter with the plan. Another attempt will be made next week.
Some pad welding on firebox roof sheet. There are a number of deep gouges in the roof sheet on right side in area of cab bracket. Pad welding of these areas began today.
Site clean up. We keep the site looking pretty good, but there is always ways to make it better. A bunch of "detail" stuff was completed and grass cut. Place looks good.
Progress is being made with acquiring bronze for rod bushings. Order could be placed this week or early the following week.
SP2479 Saturday Feb 2
John Ezovski
Small crew Saturday Feb 2. A couple of projects are moving forward.
Every quarter or so, the locomotive and tender are rolled to prevent corrosion from forming on the various journal surfaces. There sufficient track to the locomotive's drivers to complete on full revolution. Two forklifts provide the pull. the pilot truck brakes are used to stop.
The tender's air pipe to its brake cylinder had worn through . A section of schedule 80 pipe was obtained to replace the bad section of pipe. Inspection of the train air pipe mounted on the tender is also in need of replacement. Any one know a supplier that would like to donate about 60 feet of 1 1/4" schedule 80 pipe?
Repairs to the one heavily worn sander has begun. A bit of refinement is needed in the process. Hopefully this coming weekend the first step will be complete.
Friday members of the California State Railroad Museum visited the restoration site and trolley barn. Their primary mission was to examine the Lenzen Ave. turntable prior to disassembling their table for cleaning and repair. The turntable located directly behind the stare museum is identical to the Lenzen table.
While at the restoration site, the group also inspected the locomotive. During this inspection, the Jerry and Karen Lane Foundation grant was mentioned and that these funds are to be used to purchase main and side rod bronze. Albert Di Paolo, CSRM's Restoration Specialist, mentioned a possible source for rod bronze in Stockton. He will email me with contact information. It may be possible for the rod bronze to be obtained locally.
Caboose Arrives From Salinas
A caboose was hauled from Salinas to History San Jose and was coupled to SP1215.
The full story and more photos may be seen here: Caboose arrives to History Park
The caboose had been in Salinas for 19 years.
The size of the caboose dictated a somewhat roundabout route: It was transported from Salinas via highways 1, 156 onto Northbound US 101 to a bit south of Gilroy. There it was carried on highways 25 and 152 back to 101 again to continue to History San Jose. Various permits and police escorts were involved in the process.
Peninsula Crane and Rigging (Joe Bauer) provided the lift and Taylor Trucking provided the trucks.